ROLE
Level Designer
ROLE
Level Designer
ROLE
Level Designer
TOOL
UEFN
TOOL
UEFN
TOOL
UEFN
TEAM
Solo
TEAM
Solo
TEAM
Solo
TIMELINE
3 Weeks
TIMELINE
3 Weeks
TIMELINE
3 Weeks
OVERVIEW
OVERVIEW
Dark Ascension is a singleplayer shooter set inside a grim, industrial warehouse at night. Taking inspiration from Bloodborne and the Uncharted series, the level challenges the player to ascend through increasingly hostile floors to retrieve the Sapphire Egg — an ancient artifact guarded at the top of the building. The warehouse is vertically structured across multiple floors, each guarded by enemies armed with different weapon types. The player fights upward through tight corridors, open staging areas, and elevated catwalks, making moment-to-moment decisions about when to fight, when to flank, and when to push forward.
The level uses a Soulslike persistence system: death resets all enemies and ammo pickups, but any shortcut doors the player has already unlocked remain open. This means each run is faster and less punishing than the last — the player is never sent back to zero, only back to their most recent foothold. Killing enemies rewards the player with partial health recovery and a few rounds of their weapon type, making aggressive play the most efficient strategy for resource management.
Dark Ascension is a singleplayer shooter set inside a grim, industrial warehouse at night. Taking inspiration from Bloodborne and the Uncharted series, the level challenges the player to ascend through increasingly hostile floors to retrieve the Sapphire Egg — an ancient artifact guarded at the top of the building. The warehouse is vertically structured across multiple floors, each guarded by enemies armed with different weapon types. The player fights upward through tight corridors, open staging areas, and elevated catwalks, making moment-to-moment decisions about when to fight, when to flank, and when to push forward.
The level uses a Soulslike persistence system: death resets all enemies and ammo pickups, but any shortcut doors the player has already unlocked remain open. This means each run is faster and less punishing than the last — the player is never sent back to zero, only back to their most recent foothold. Killing enemies rewards the player with partial health recovery and a few rounds of their weapon type, making aggressive play the most efficient strategy for resource management.
CONFIDENCE THROUGH REPETITION
CONFIDENCE THROUGH REPETITION
Just like a Souslike game, not everything is meant to be beaten the first time around (certainly possible, but unlikely). However, we want each run to be more familiar to the player, as they slowly and steadily get better.
Just like a Souslike game, not everything is meant to be beaten the first time around (certainly possible, but unlikely). However, we want each run to be more familiar to the player, as they slowly and steadily get better.
DEATH AS INFORMATION
DEATH AS INFORMATION
Every failure, no matter the cause, should teach the player meaningful lessons about how to get better. They should always feel fair and encourage the player to try and come up with another strategy to overcome the challenges.
Every failure, no matter the cause, should teach the player meaningful lessons about how to get better. They should always feel fair and encourage the player to try and come up with another strategy to overcome the challenges.
AGGRESSION IS KEY
AGGRESSION IS KEY
We want to encourage the player to be more aggressive in their gunplay and initiate fights rather than wait quietly at a corner. Killing enemies rather than sneaking around is the best way to stay alive.
LAYOUT
LAYOUT
OVERVIEW
OVERVIEW
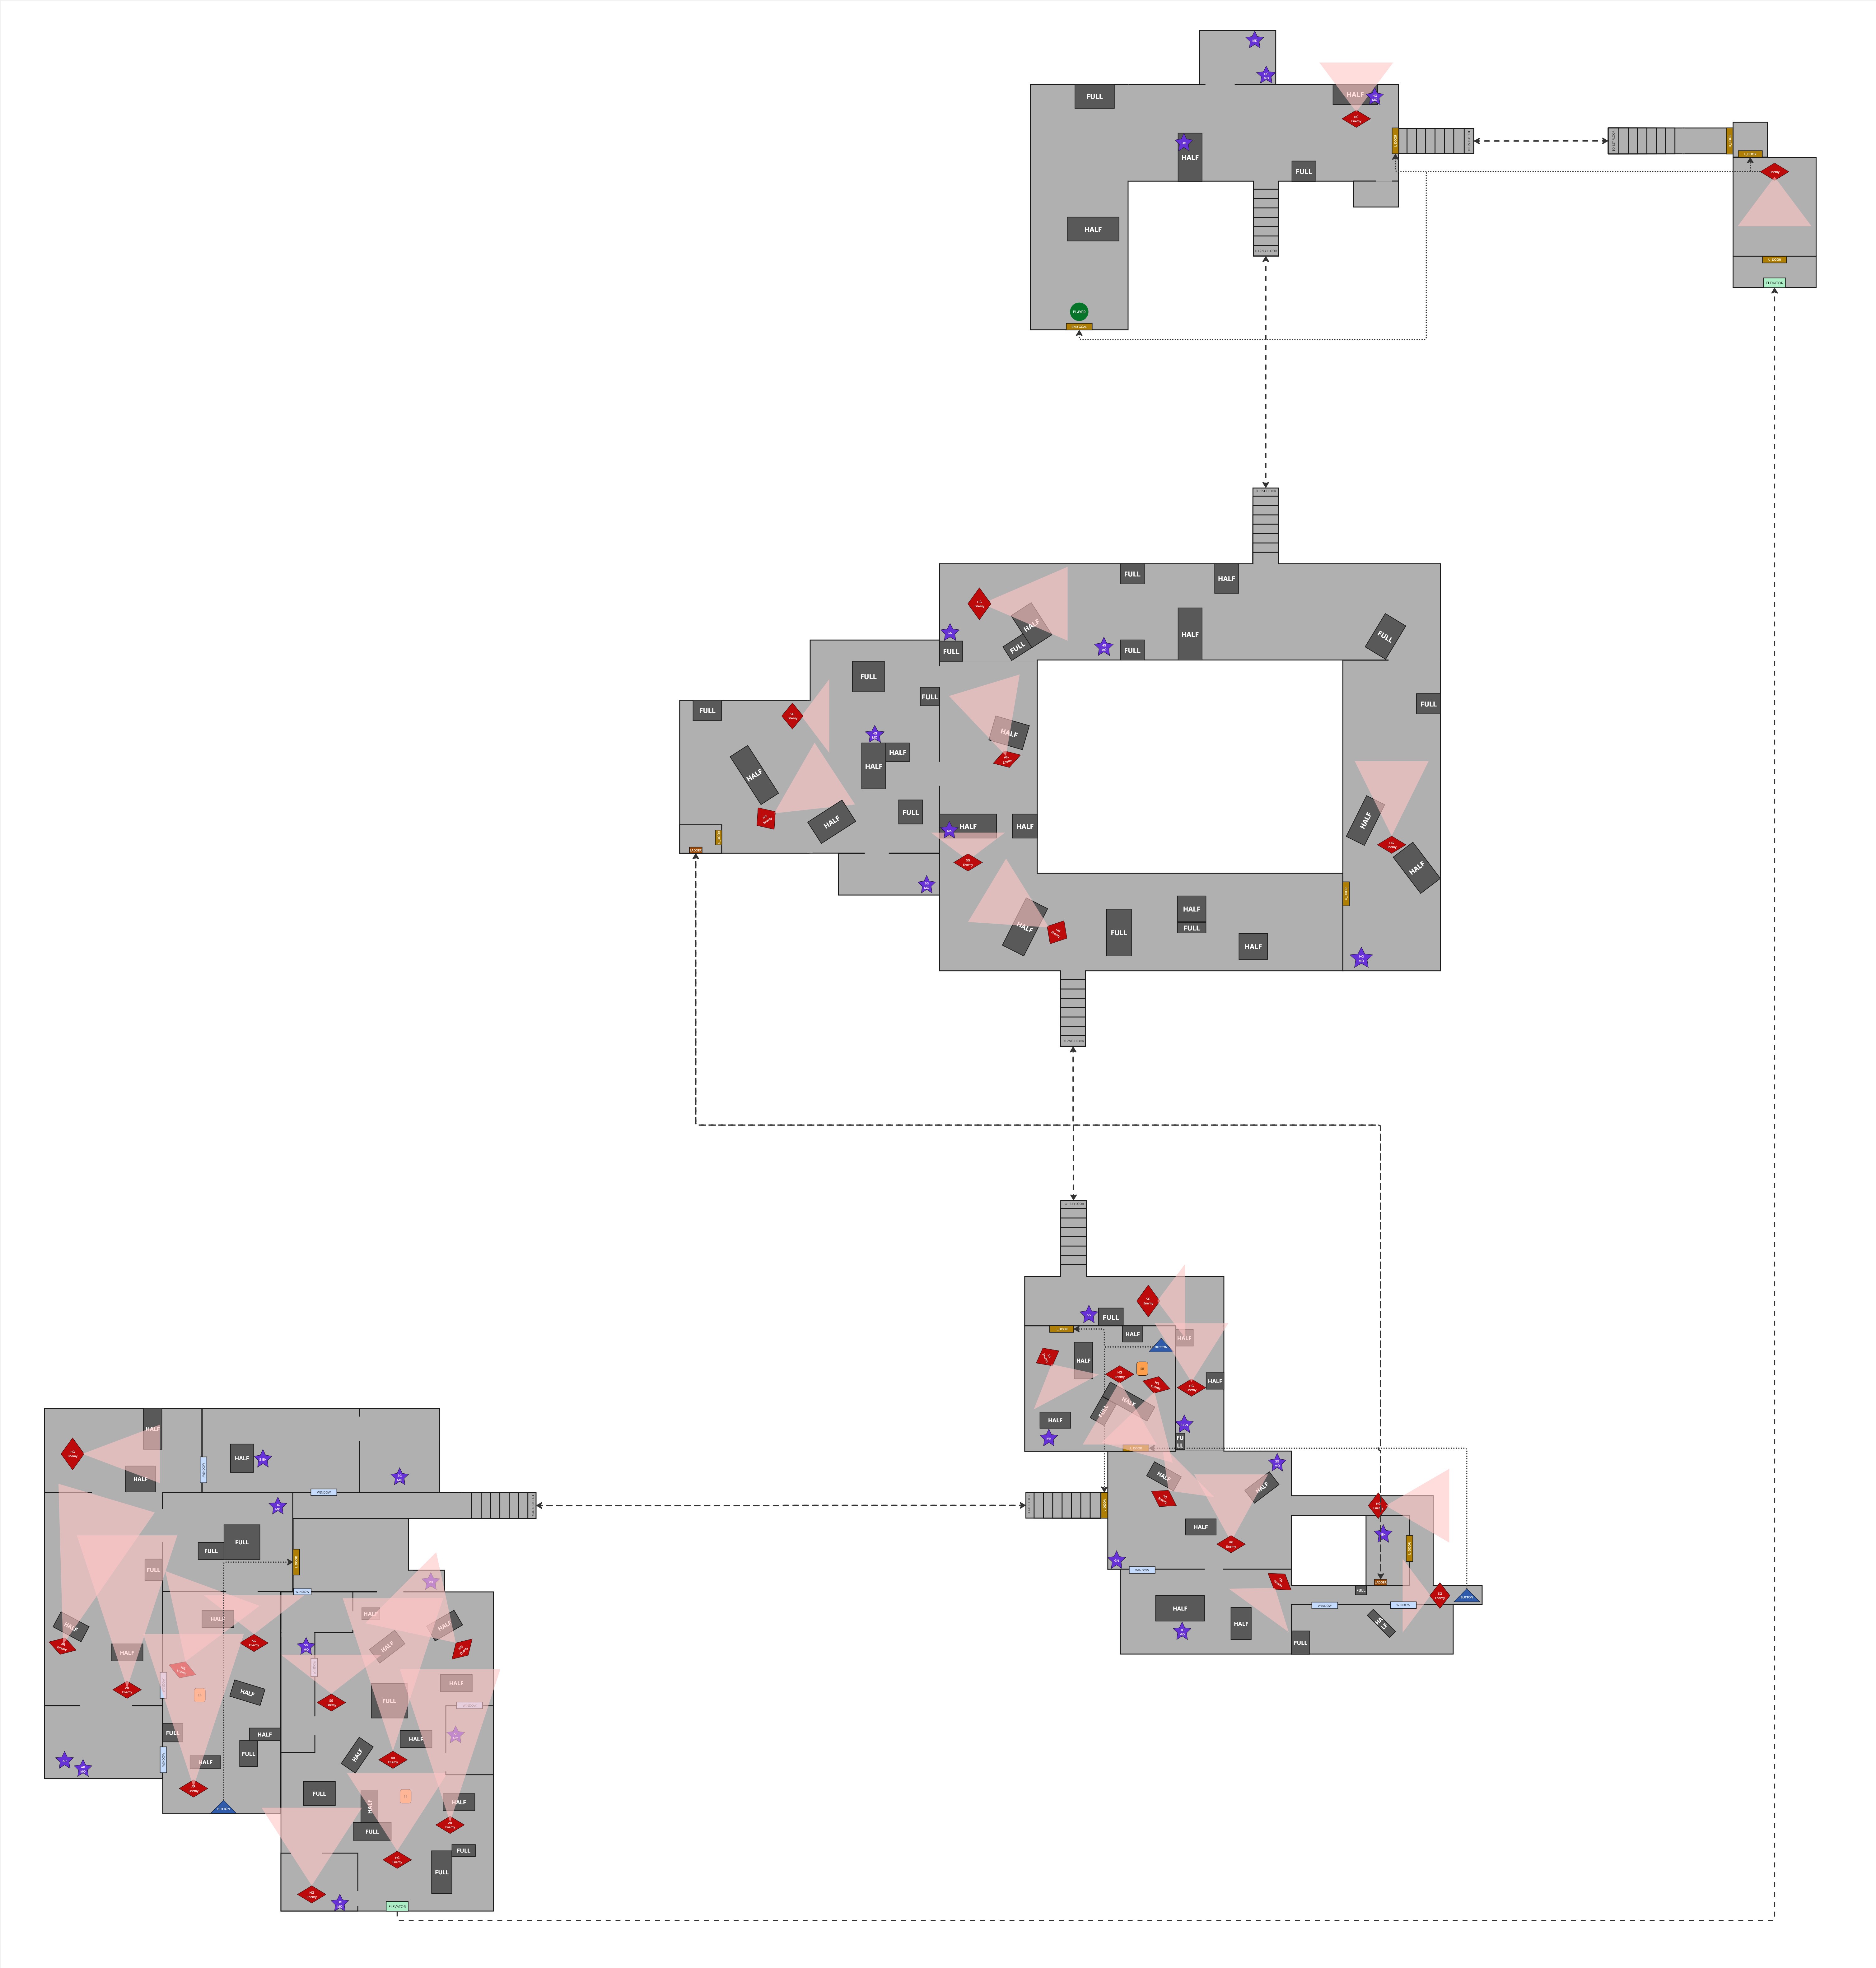
Dark Ascension is structured across four active floors of an industrial warehouse, with a underground basement serving as the final boss arena. Progression is broadly linear and vertical — the player climbs floor by floor — but the level is threaded with shortcuts that collapse travel time on repeat runs, echoing the Soulslike design philosophy that death should never feel like a full reset.
Dark Ascension is structured across four active floors of an industrial warehouse, with a underground basement serving as the final boss arena. Progression is broadly linear and vertical — the player climbs floor by floor — but the level is threaded with shortcuts that collapse travel time on repeat runs, echoing the Soulslike design philosophy that death should never feel like a full reset.
Dark Ascension is structured across four active floors of an industrial warehouse, with a underground basement serving as the final boss arena. Progression is broadly linear and vertical — the player climbs floor by floor — but the level is threaded with shortcuts that collapse travel time on repeat runs, echoing the Soulslike design philosophy that death should never feel like a full reset.
1ST FLOOR
1ST FLOOR
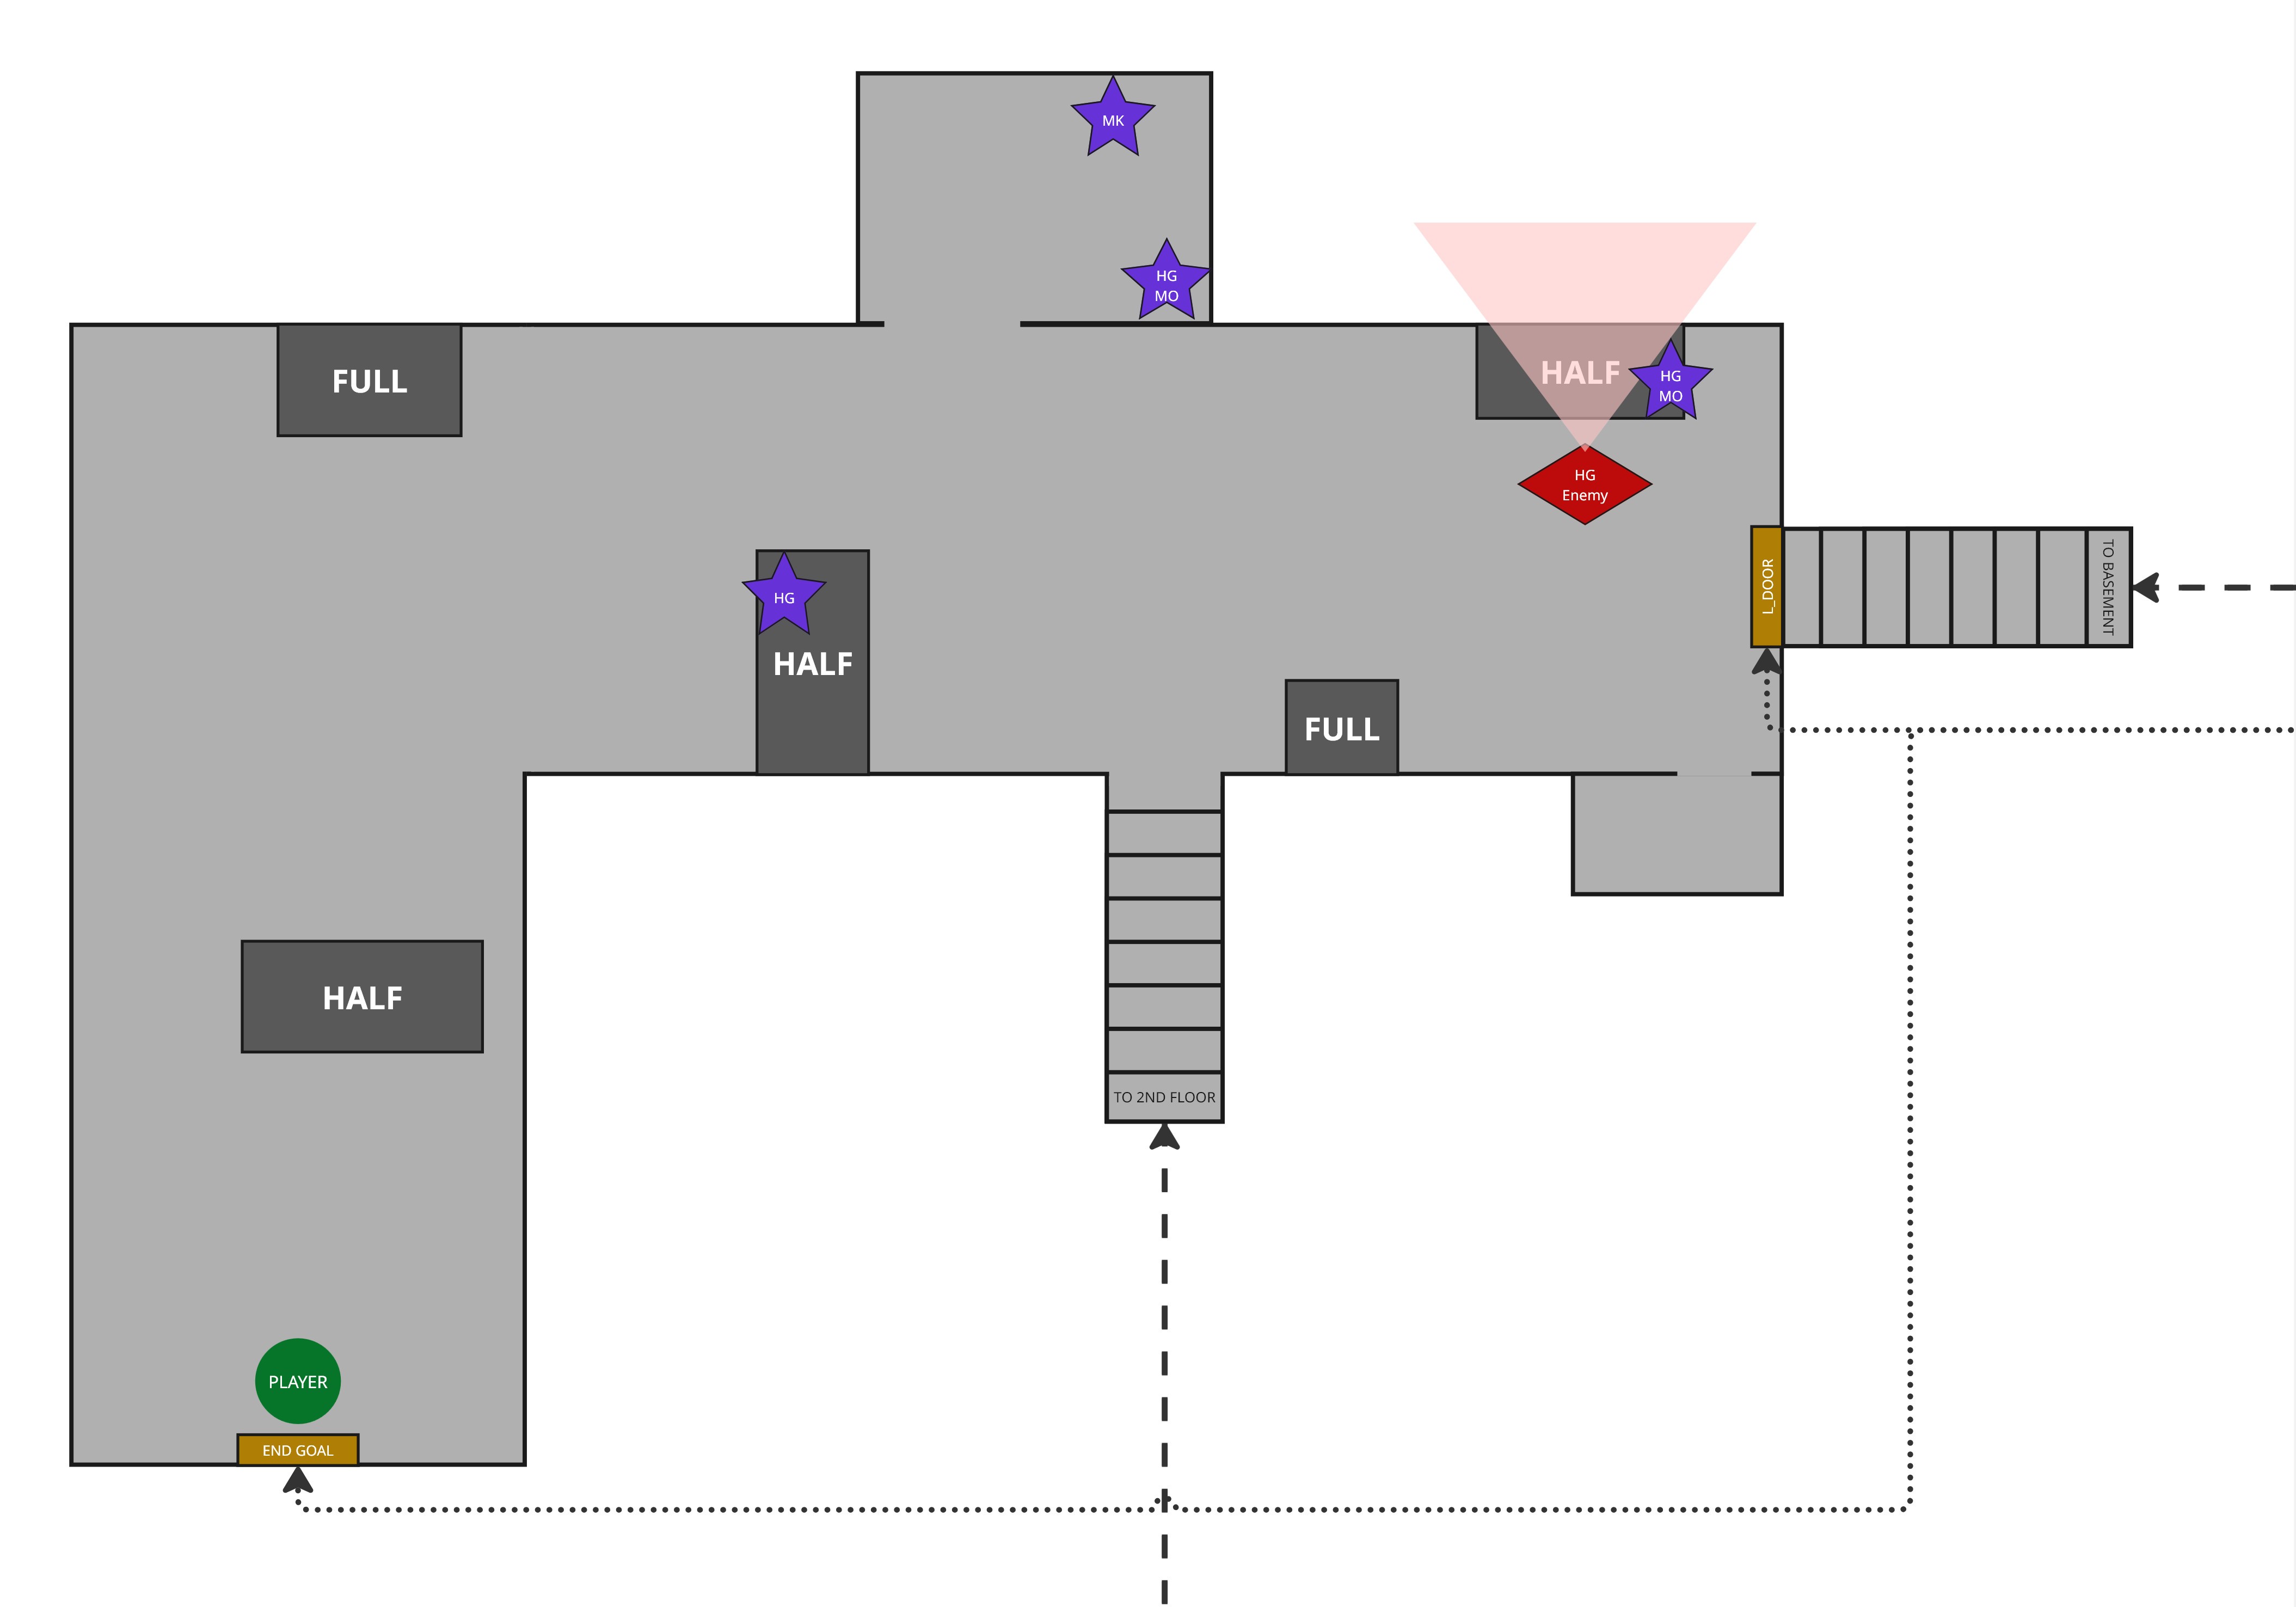
The player spawns in a ground-floor corridor and picks up their first weapon, the pistol. This floor introduces all basic controls: moving, vaulting, running, and shooting. Enemy density is low. At the end of the hallway is a locked door that only opens after the player completes the full run and kills the final boss — a shortcut that closes the loop on the entire level geographically.
The player spawns in a ground-floor corridor and picks up their first weapon, the pistol. This floor introduces all basic controls: moving, vaulting, running, and shooting. Enemy density is low. At the end of the hallway is a locked door that only opens after the player completes the full run and kills the final boss — a shortcut that closes the loop on the entire level geographically.
The player spawns in a ground-floor corridor and picks up their first weapon, the pistol. This floor introduces all basic controls: moving, vaulting, running, and shooting. Enemy density is low. At the end of the hallway is a locked door that only opens after the player completes the full run and kills the final boss — a shortcut that closes the loop on the entire level geographically.
2ND FLOOR
2ND FLOOR
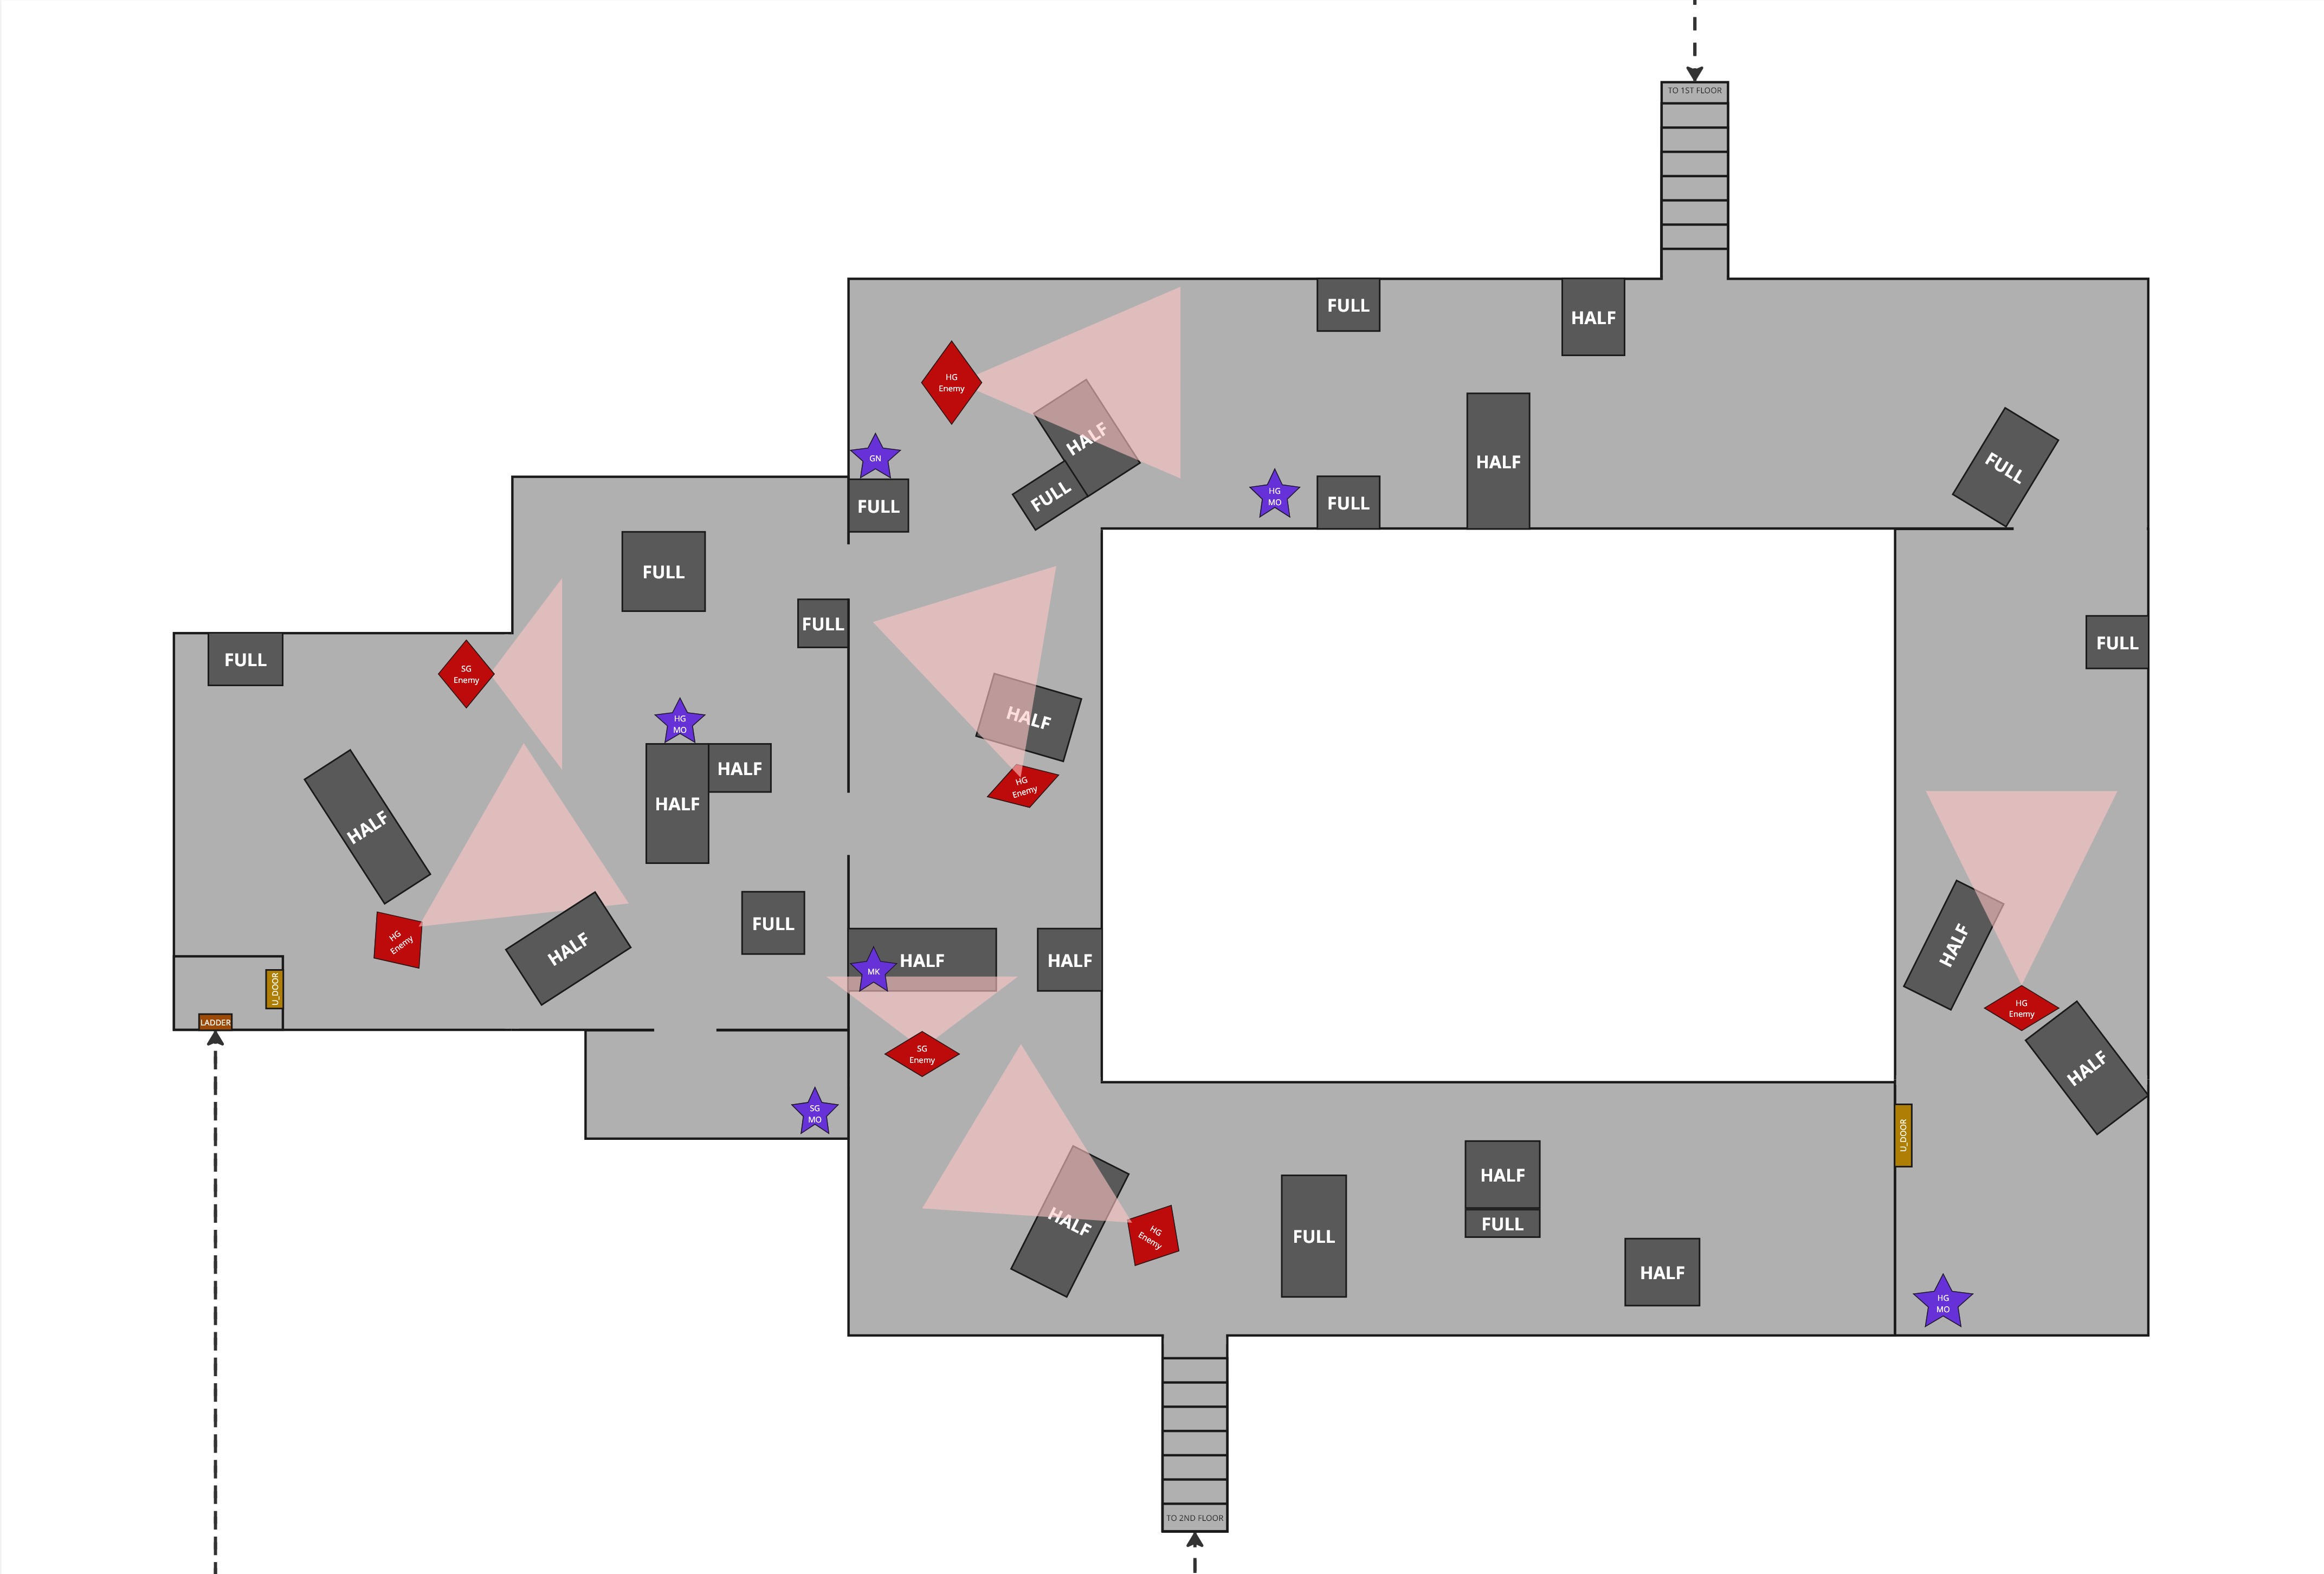
The player ascends via stairs into a large circular floor with an outdoor section. Two routes are available from the start: one clearly visible, one hidden behind a large closet. The hidden route has fewer enemies and reaches the floor exit faster, rewarding observant players who explore rather than follow the obvious path. The outdoor area contains a ladder — the main vertical shortcut of the level — that bypasses floor 3 entirely once the player has unlocked it.
The player ascends via stairs into a large circular floor with an outdoor section. Two routes are available from the start: one clearly visible, one hidden behind a large closet. The hidden route has fewer enemies and reaches the floor exit faster, rewarding observant players who explore rather than follow the obvious path. The outdoor area contains a ladder — the main vertical shortcut of the level — that bypasses floor 3 entirely once the player has unlocked it.
The player ascends via stairs into a large circular floor with an outdoor section. Two routes are available from the start: one clearly visible, one hidden behind a large closet. The hidden route has fewer enemies and reaches the floor exit faster, rewarding observant players who explore rather than follow the obvious path. The outdoor area contains a ladder — the main vertical shortcut of the level — that bypasses floor 3 entirely once the player has unlocked it.
3RD FLOOR
3RD FLOOR
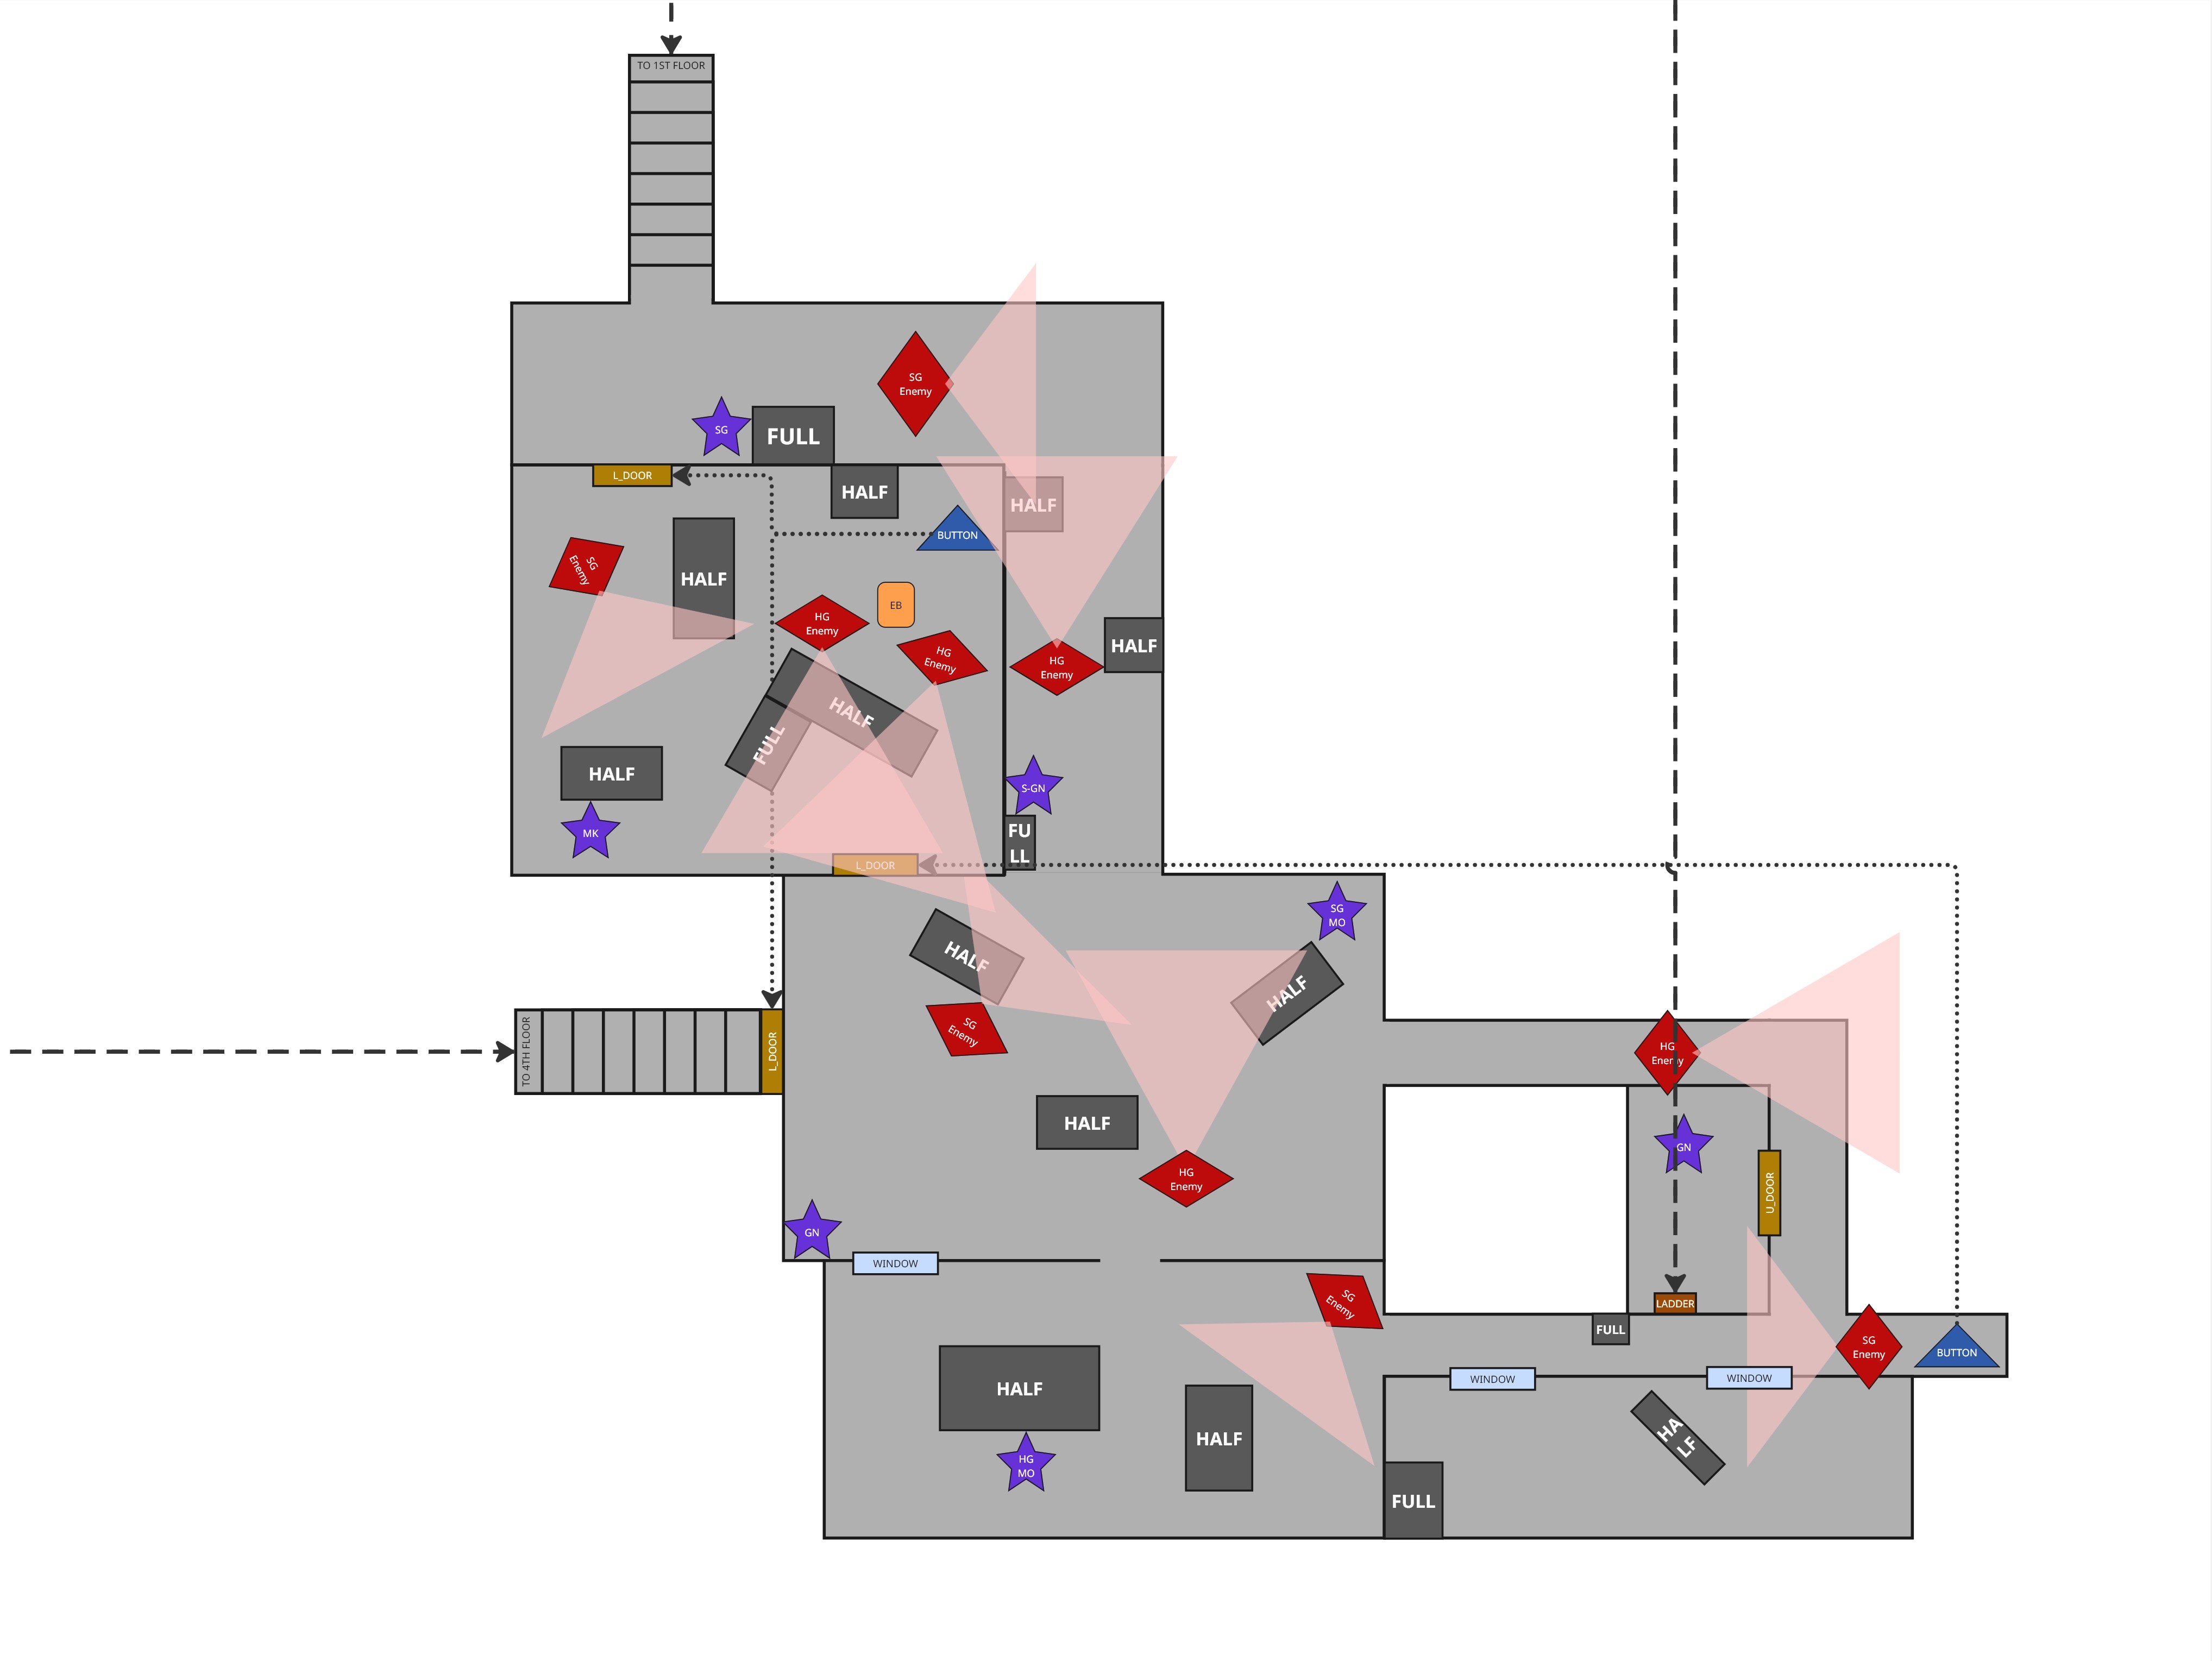
Originally a dedicated floor introducing shotguns, explosive barrels, and persistent shortcut doors. Removed from the final build due to scope. Its core shortcut — a cross-room path that lets the player skip most of the floor to reach the stairs — was preserved and repurposed in the transition to the shipped version. The ladder shortcut from floor 2's outdoor area now connects directly to the final encounter floor.
Originally a dedicated floor introducing shotguns, explosive barrels, and persistent shortcut doors. Removed from the final build due to scope. Its core shortcut — a cross-room path that lets the player skip most of the floor to reach the stairs — was preserved and repurposed in the transition to the shipped version. The ladder shortcut from floor 2's outdoor area now connects directly to the final encounter floor.
Originally a dedicated floor introducing shotguns, explosive barrels, and persistent shortcut doors. Removed from the final build due to scope. Its core shortcut — a cross-room path that lets the player skip most of the floor to reach the stairs — was preserved and repurposed in the transition to the shipped version. The ladder shortcut from floor 2's outdoor area now connects directly to the final encounter floor.
4TH FLOOR
4TH FLOOR
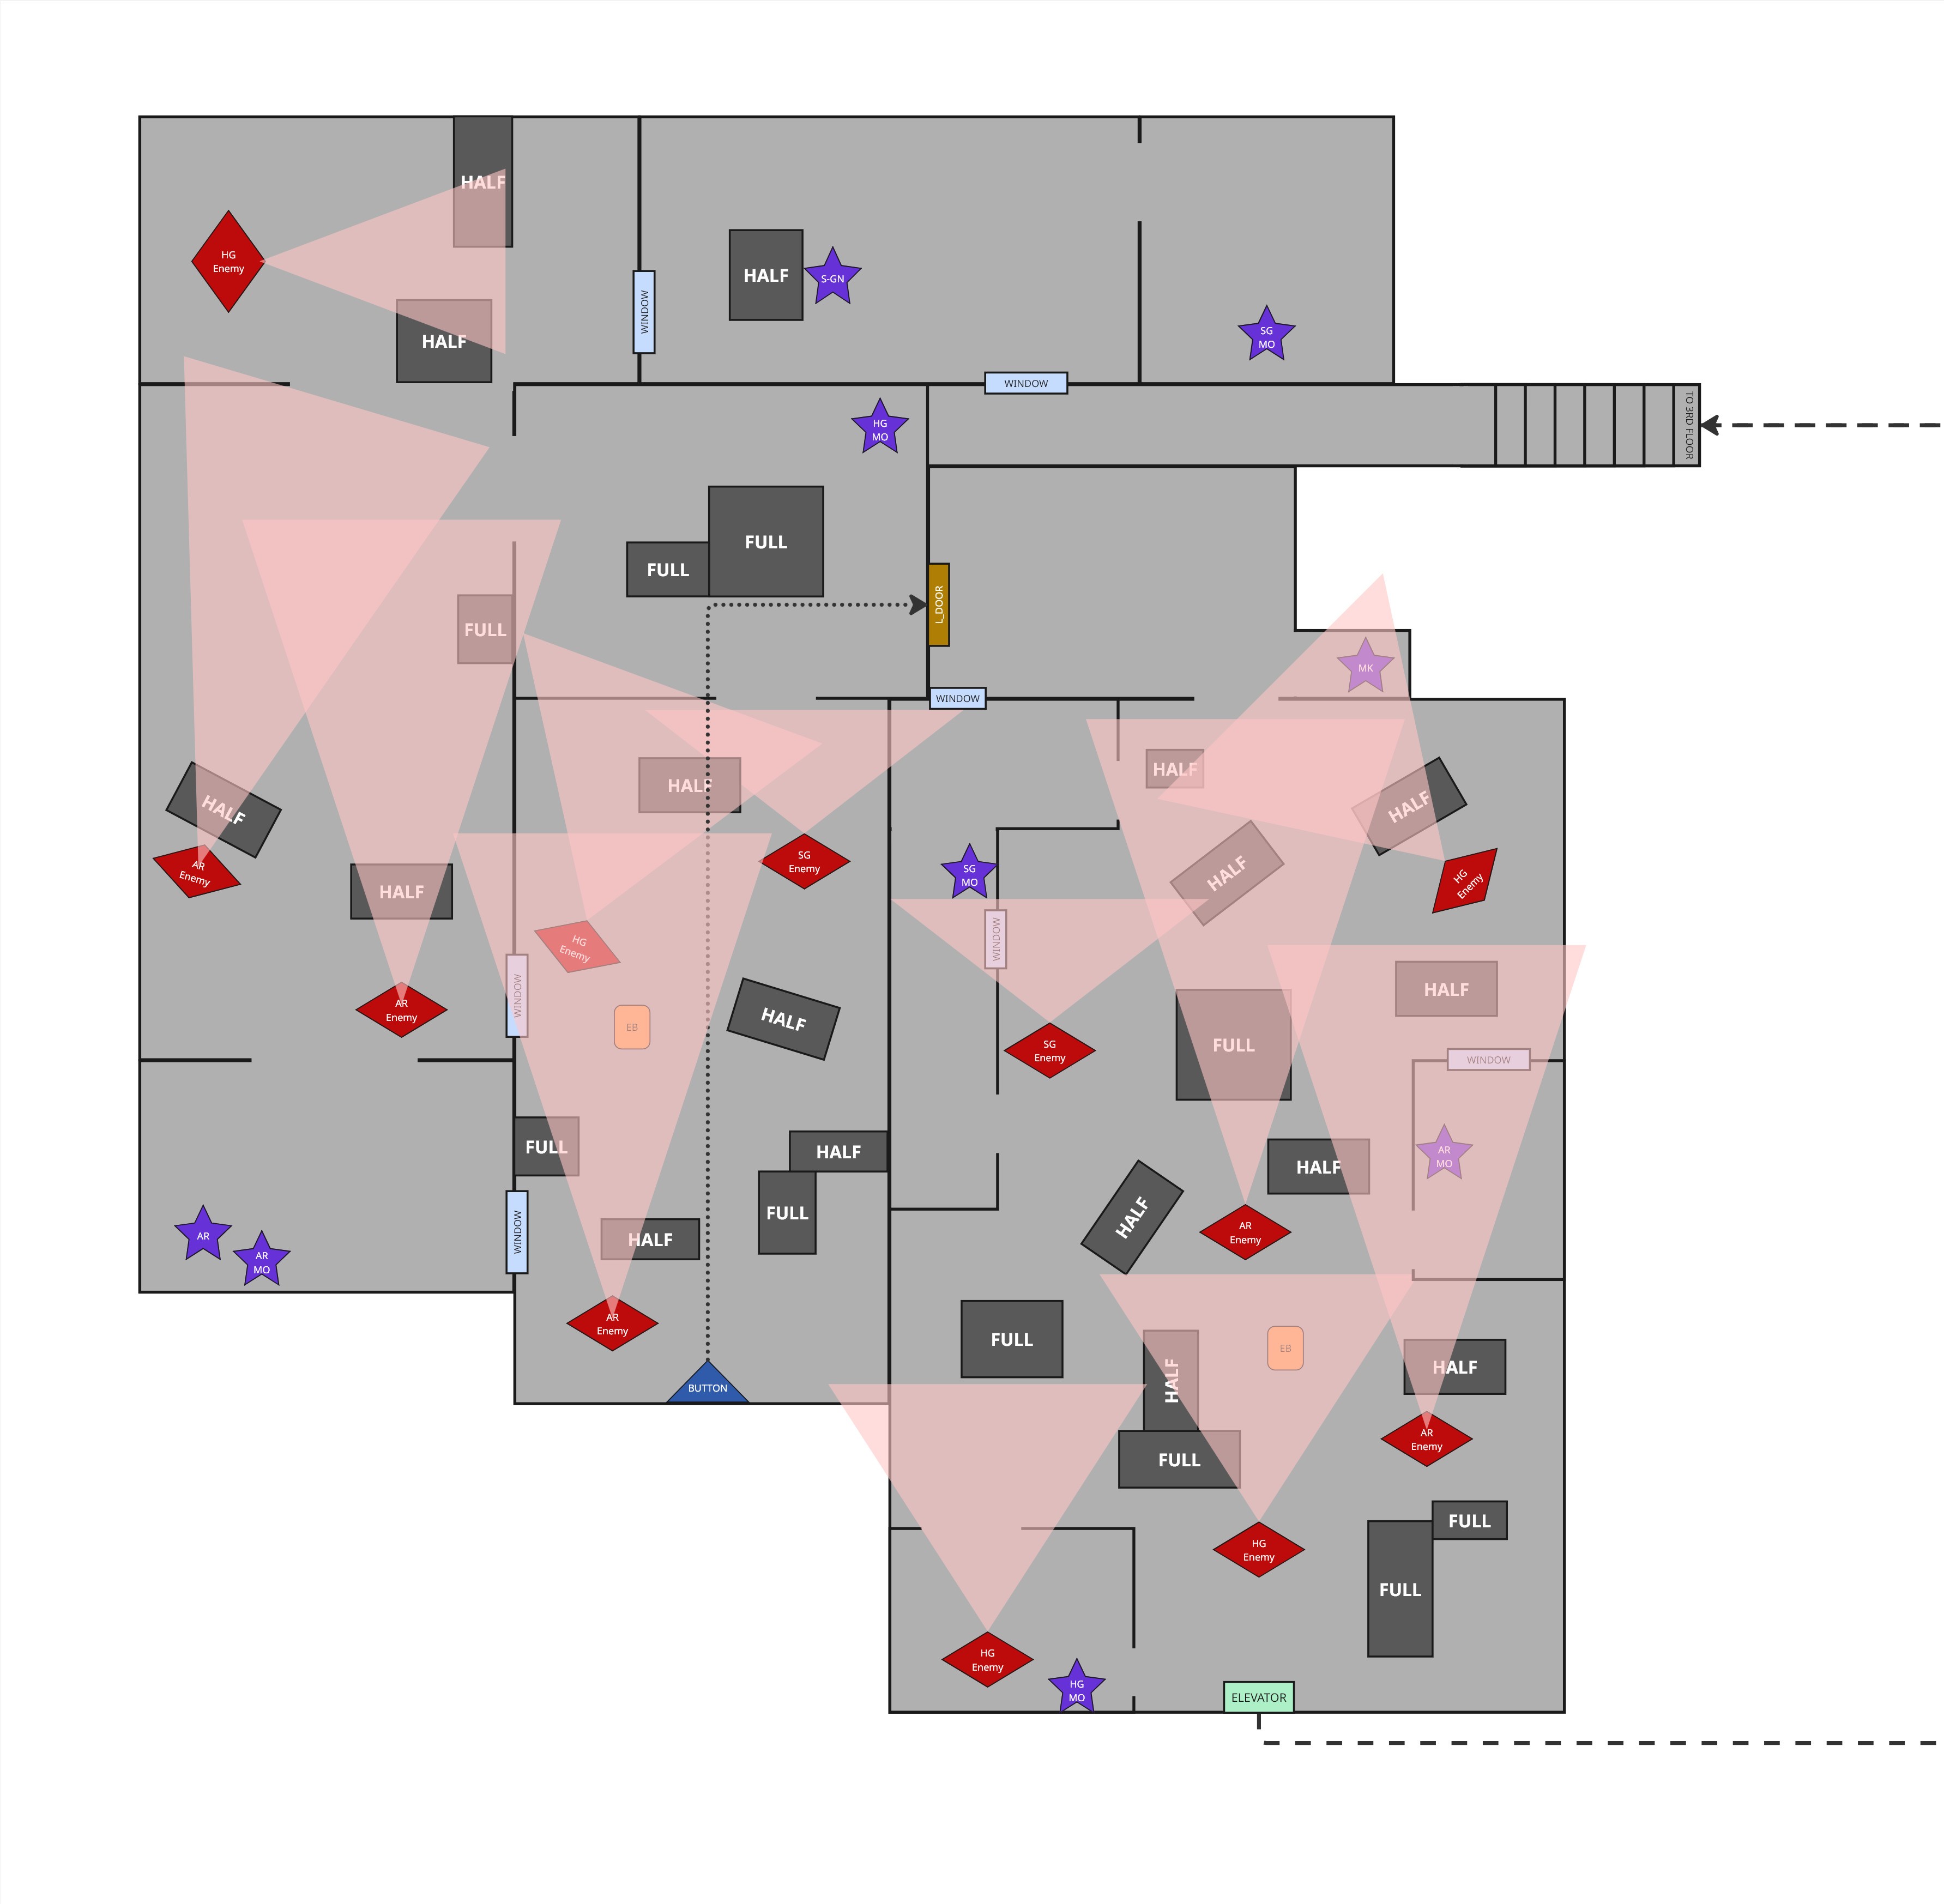
The most enemy-dense floor and the site of the final encounter documented in this portfolio. The AR is introduced here, completing the player's arsenal. The floor demands fluency with every mechanic — flanking, explosive barrels, shortcut doors, weapon switching, kill-to-heal — before the player can reach the elevator at the deepest corner of the room.
The most enemy-dense floor and the site of the final encounter documented in this portfolio. The AR is introduced here, completing the player's arsenal. The floor demands fluency with every mechanic — flanking, explosive barrels, shortcut doors, weapon switching, kill-to-heal — before the player can reach the elevator at the deepest corner of the room.
The most enemy-dense floor and the site of the final encounter documented in this portfolio. The AR is introduced here, completing the player's arsenal. The floor demands fluency with every mechanic — flanking, explosive barrels, shortcut doors, weapon switching, kill-to-heal — before the player can reach the elevator at the deepest corner of the room.
BASEMENT
BASEMENT
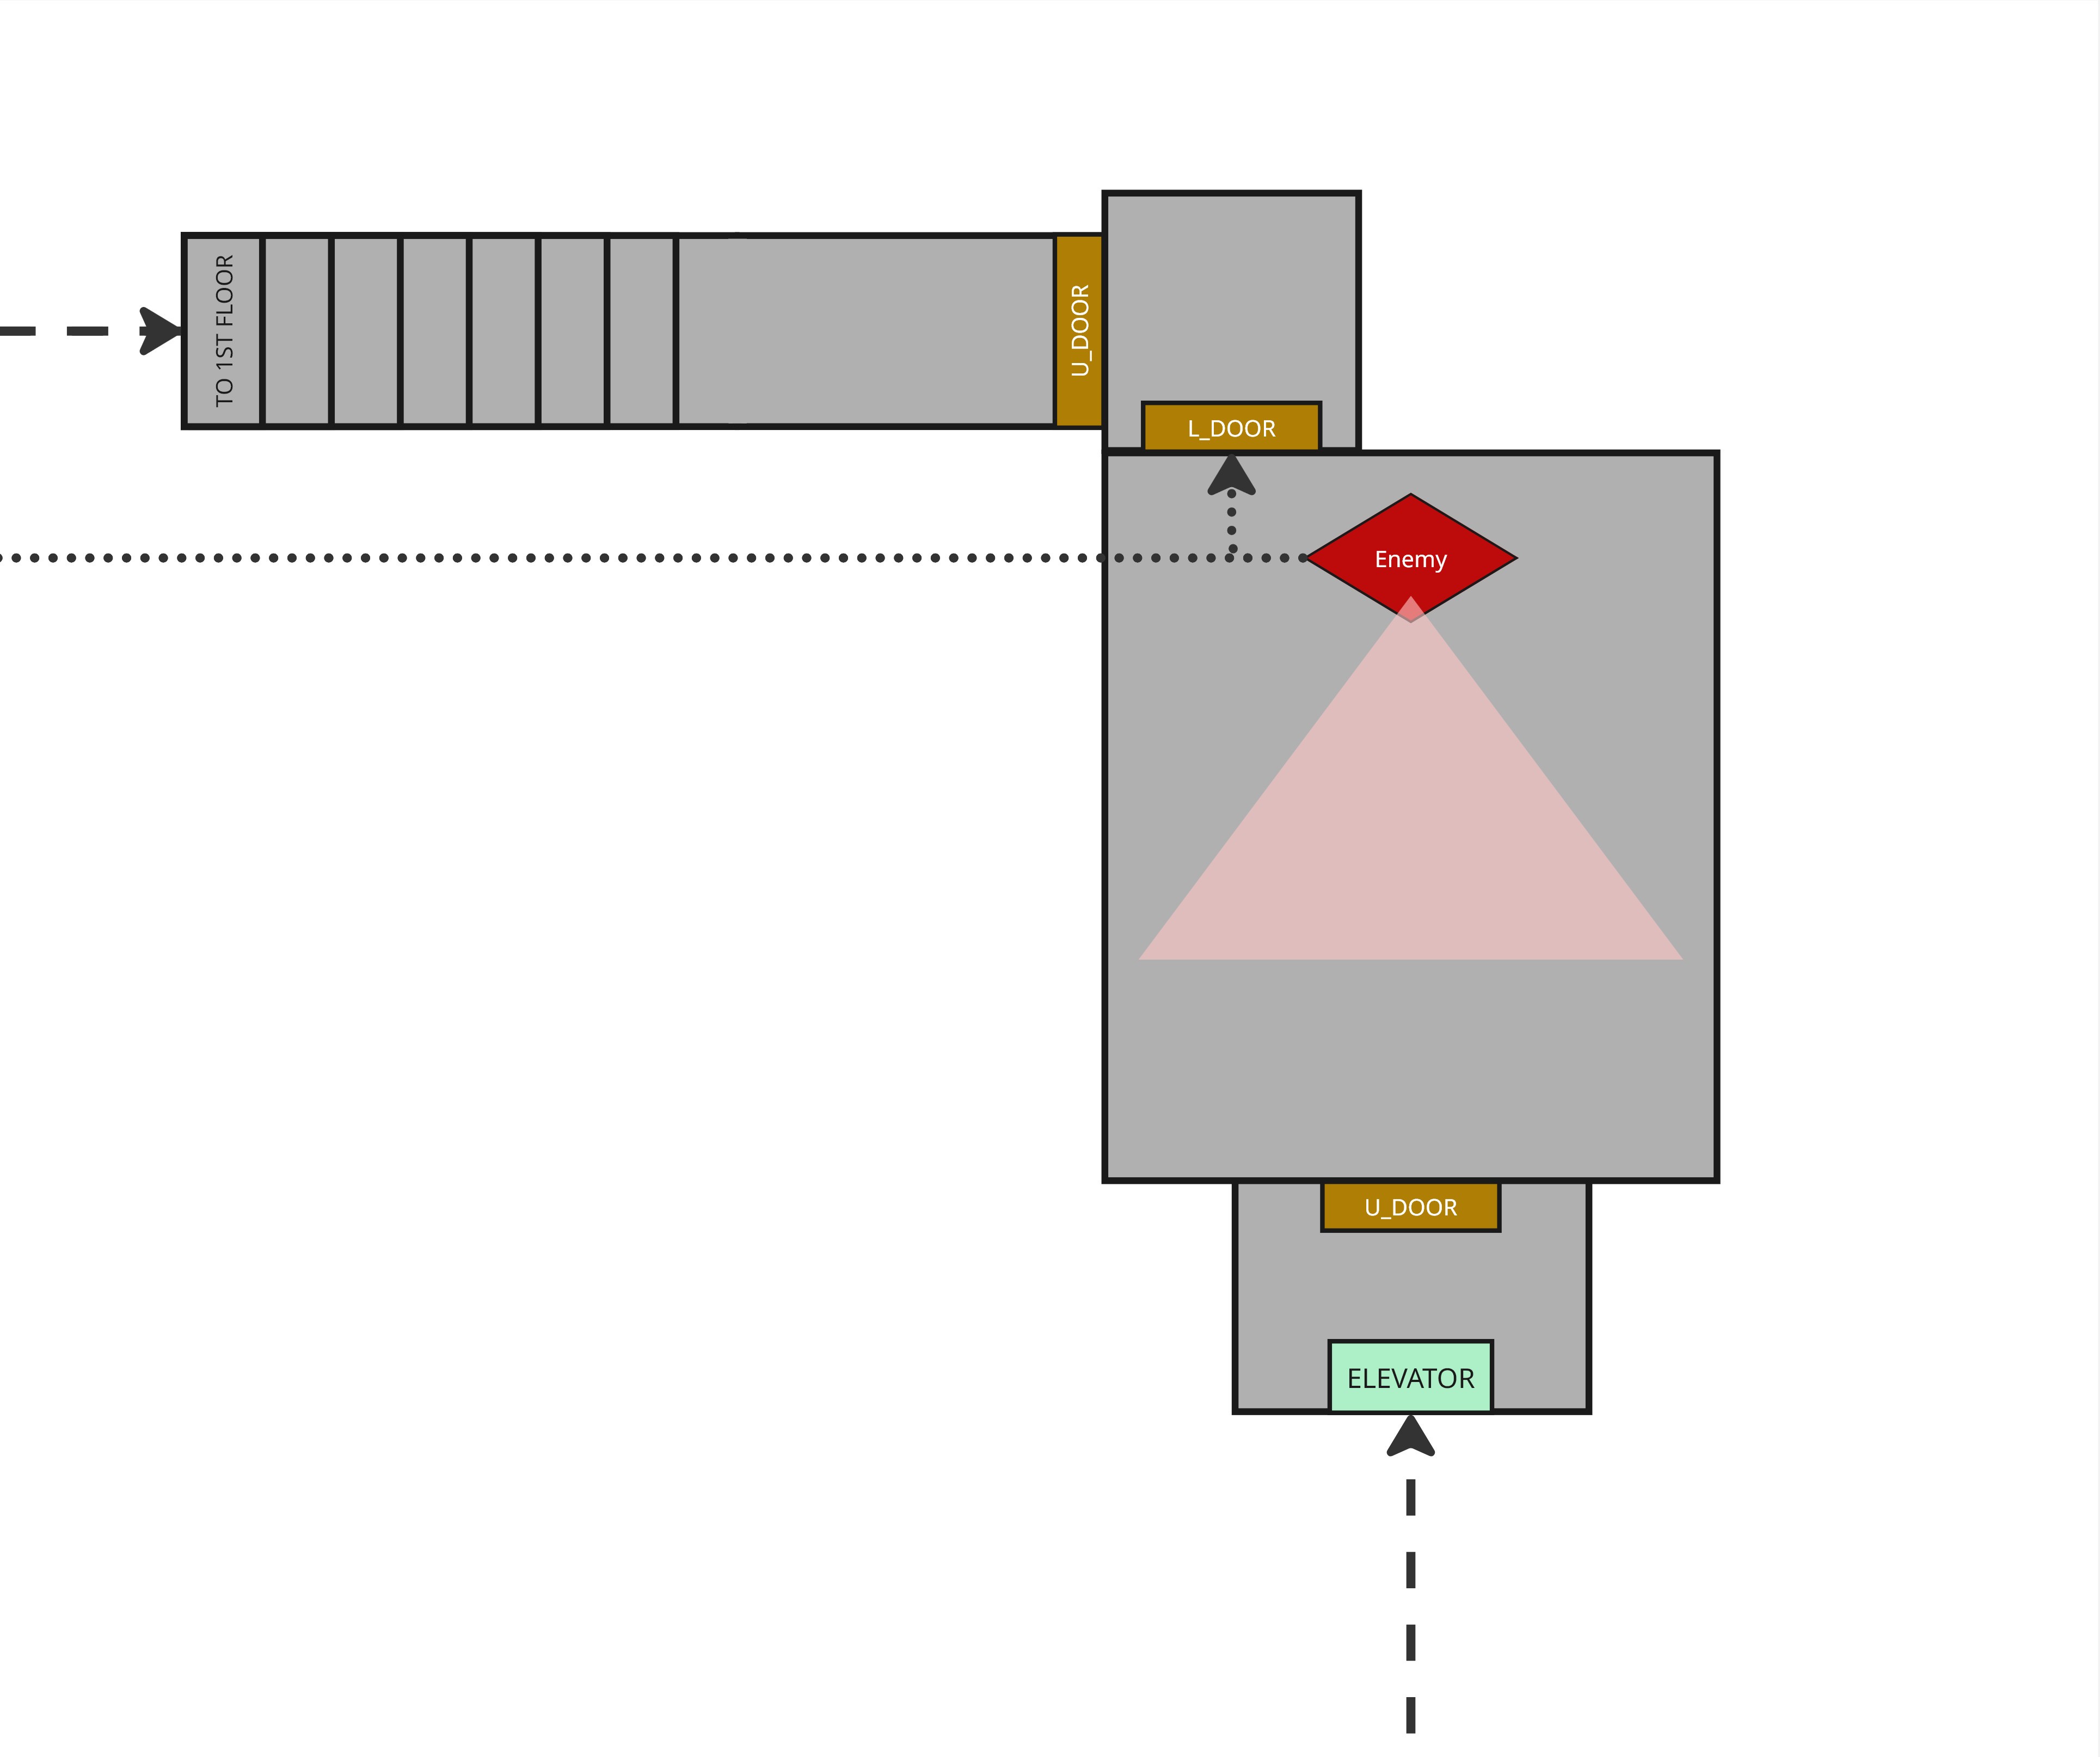
The elevator descends to an underground arena where the player confronts the mission target: an unarmed figure who is the narrative endpoint of the level, framed like a contract kill in the vein of John Wick. Killing the boss triggers the shortcut door at the end of floor 1's hallway, allowing the player to exit and complete the level.
The elevator descends to an underground arena where the player confronts the mission target: an unarmed figure who is the narrative endpoint of the level, framed like a contract kill in the vein of John Wick. Killing the boss triggers the shortcut door at the end of floor 1's hallway, allowing the player to exit and complete the level.
The elevator descends to an underground arena where the player confronts the mission target: an unarmed figure who is the narrative endpoint of the level, framed like a contract kill in the vein of John Wick. Killing the boss triggers the shortcut door at the end of floor 1's hallway, allowing the player to exit and complete the level.
DESIGN DEEP DIVE
DESIGN DEEP DIVE
CONCEPT
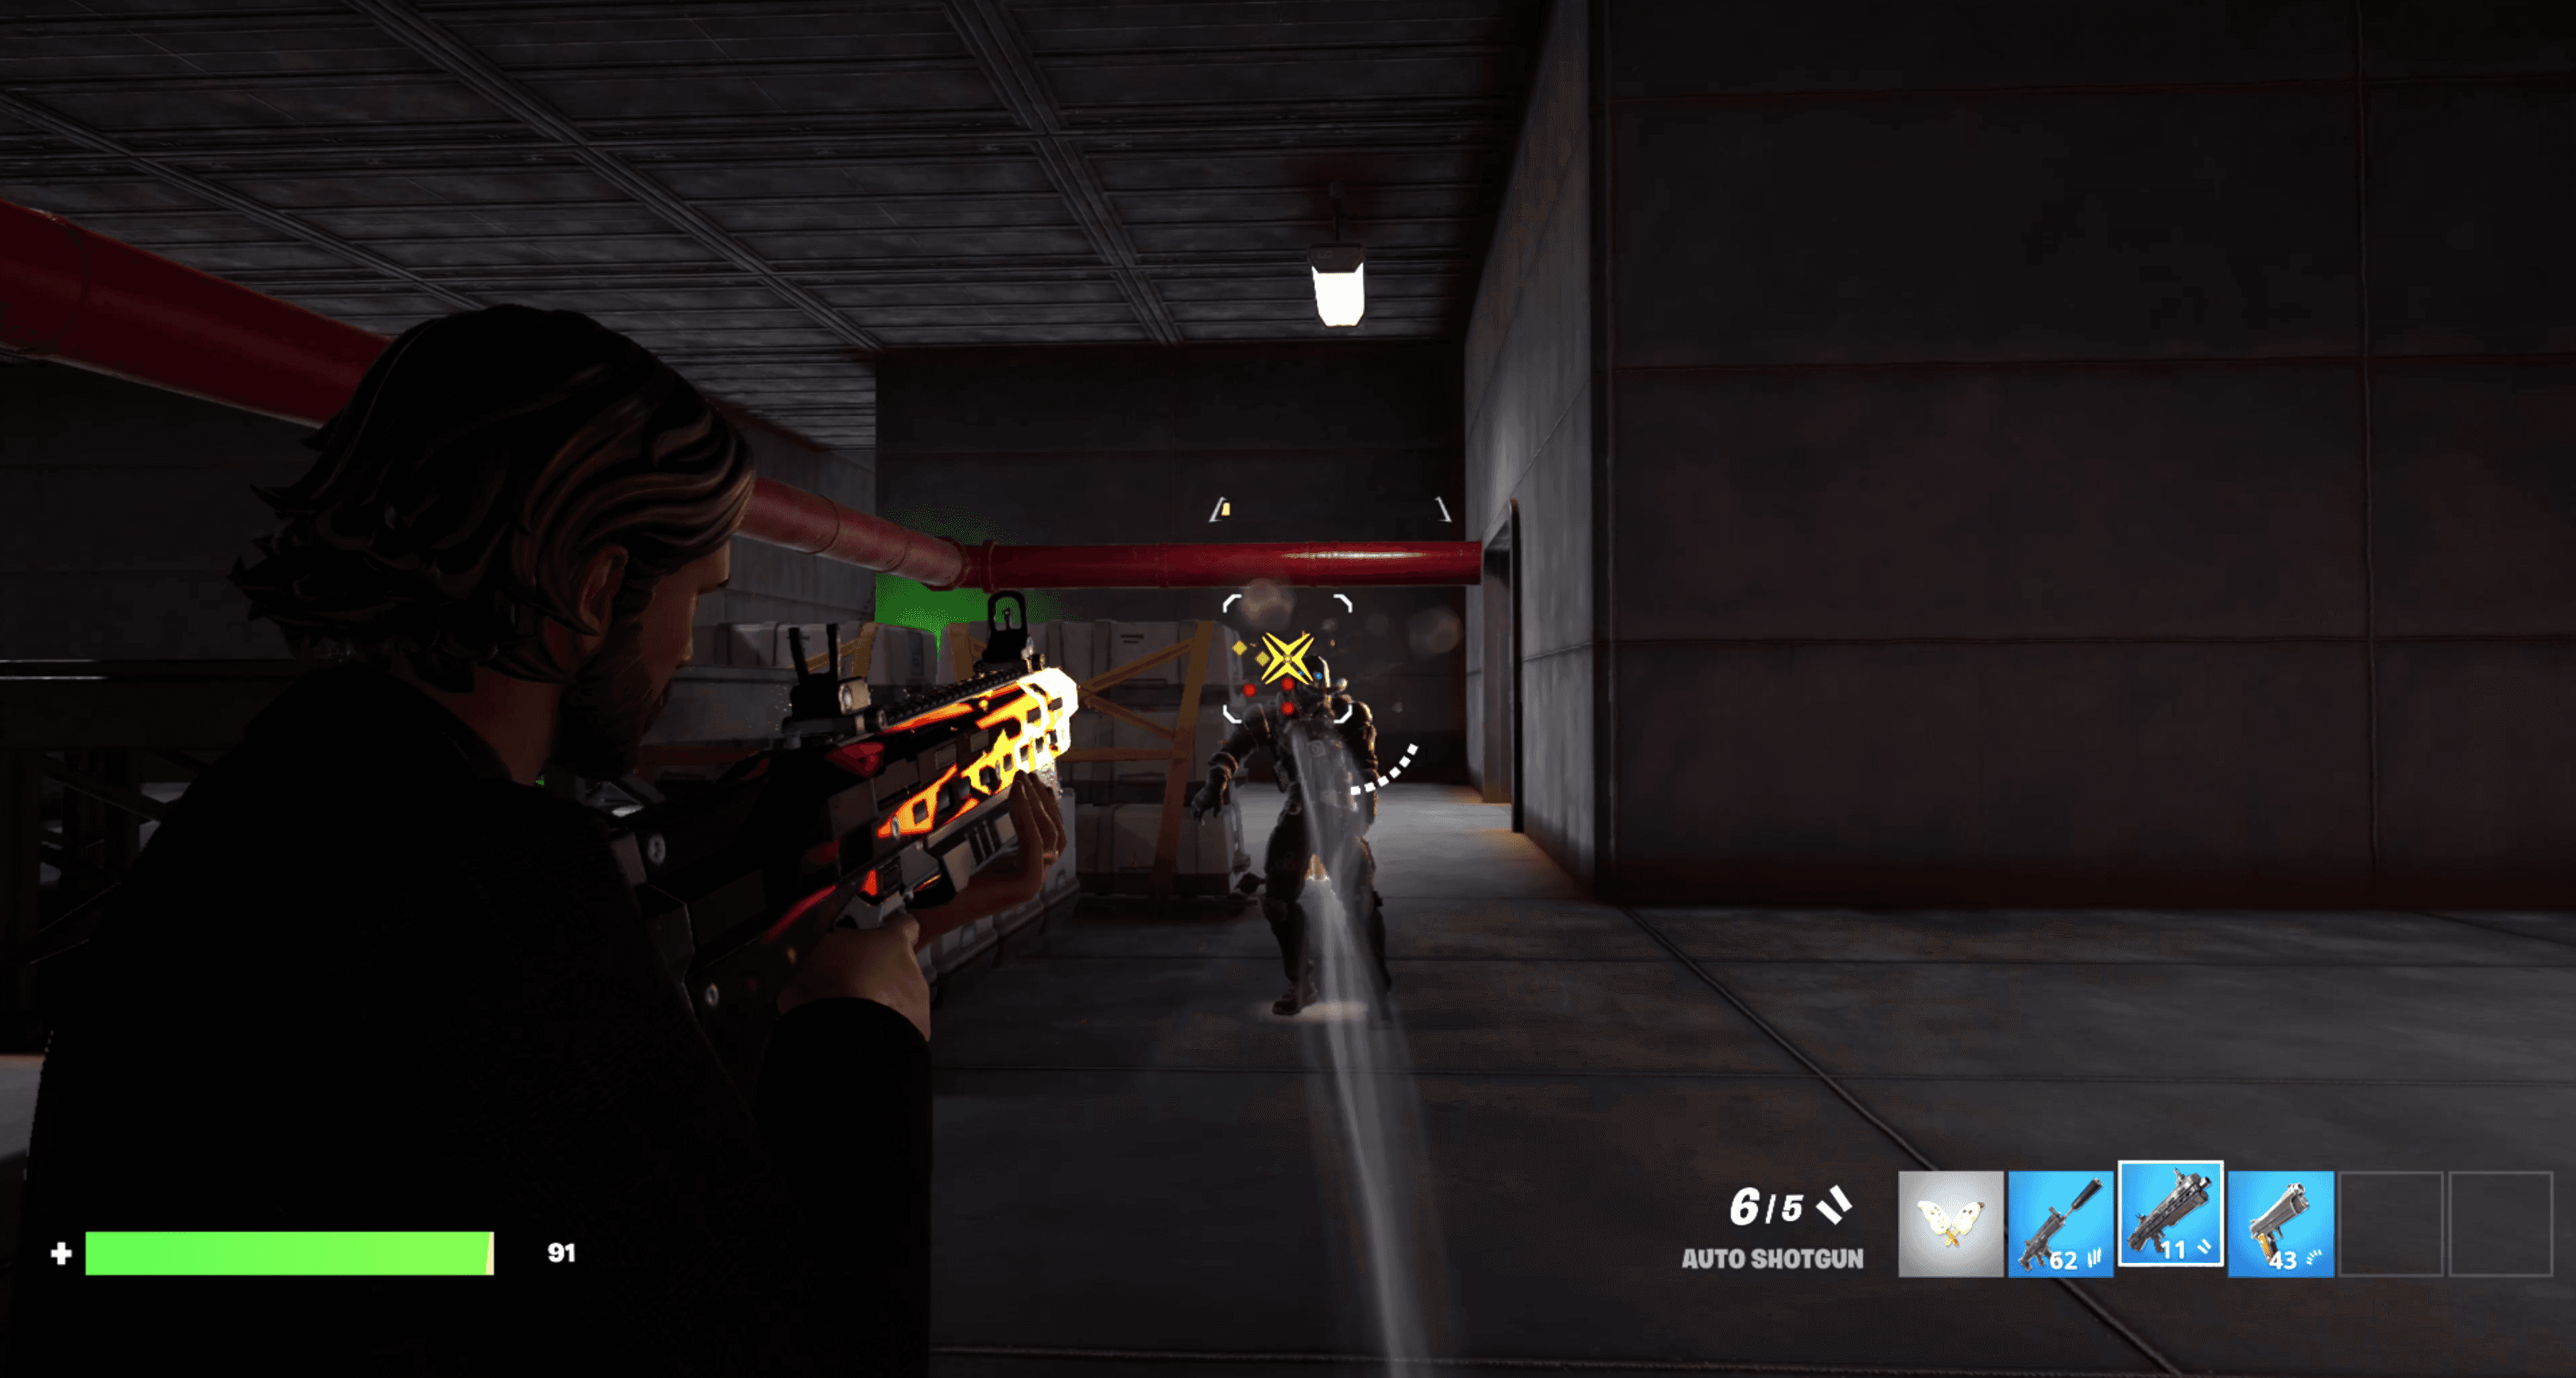
As a climactic encounter, the final arena needed to accomplish three things simultaneously: synthesize all mechanics the player had encountered earlier in the level, give experienced players multiple strategic options to approach the fight, and create a moment of genuine threat without feeling arbitrary. The encounter had to respect the Soulslike loop — a player who had died here before should feel their prior knowledge paying off, while a first-time player should feel challenged but never confused about what killed them.
The core spatial concept was a wide, open dead zone in the center of the arena, flanked by two alternative routes — one on each side — and a catwalk above. The goal marker (the staircase) is visible from the entrance, giving the player an immediate read on the objective. The right wall also has a shortcut door the player may have unlocked earlier, allowing them to bypass the entrance entirely and emerge in the middle of the arena, flanking the flankers.
As a climactic encounter, the final arena needed to accomplish three things simultaneously: synthesize all mechanics the player had encountered earlier in the level, give experienced players multiple strategic options to approach the fight, and create a moment of genuine threat without feeling arbitrary. The encounter had to respect the Soulslike loop — a player who had died here before should feel their prior knowledge paying off, while a first-time player should feel challenged but never confused about what killed them.
The core spatial concept was a wide, open dead zone in the center of the arena, flanked by two alternative routes — one on each side — and a catwalk above. The goal marker (the staircase) is visible from the entrance, giving the player an immediate read on the objective. The right wall also has a shortcut door the player may have unlocked earlier, allowing them to bypass the entrance entirely and emerge in the middle of the arena, flanking the flankers.
As a climactic encounter, the final arena needed to accomplish three things simultaneously: synthesize all mechanics the player had encountered earlier in the level, give experienced players multiple strategic options to approach the fight, and create a moment of genuine threat without feeling arbitrary. The encounter had to respect the Soulslike loop — a player who had died here before should feel their prior knowledge paying off, while a first-time player should feel challenged but never confused about what killed them.
The core spatial concept was a wide, open dead zone in the center of the arena, flanked by two alternative routes — one on each side — and a catwalk above. The goal marker (the staircase) is visible from the entrance, giving the player an immediate read on the objective. The right wall also has a shortcut door the player may have unlocked earlier, allowing them to bypass the entrance entirely and emerge in the middle of the arena, flanking the flankers.
ITERATIONS
PAPER DESIGN
PAPER DESIGN
PAPER DESIGN
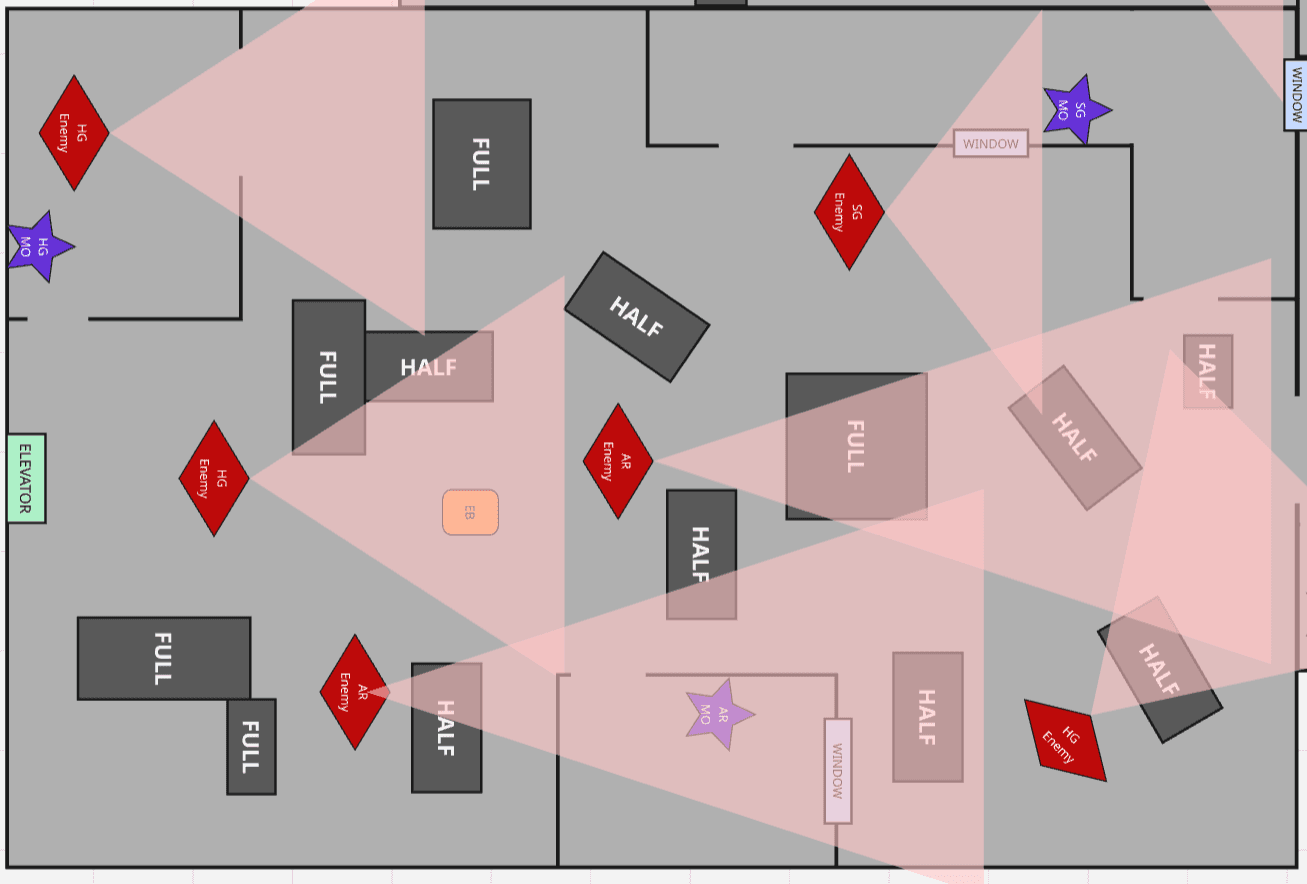
The initial paper design established the core spatial layout: a central dead zone, two flanking routes, enemy positions, and cover ratings. This stage defined the encounter's structure on paper — where enemies stand, what cover they use, and how the player is expected to move through the space.
The initial paper design established the core spatial layout: a central dead zone, two flanking routes, enemy positions, and cover ratings. This stage defined the encounter's structure on paper — where enemies stand, what cover they use, and how the player is expected to move through the space.
The initial paper design established the core spatial layout: a central dead zone, two flanking routes, enemy positions, and cover ratings. This stage defined the encounter's structure on paper — where enemies stand, what cover they use, and how the player is expected to move through the space.
PAPER DESIGN
PAPER DESIGN
PAPER DESIGN
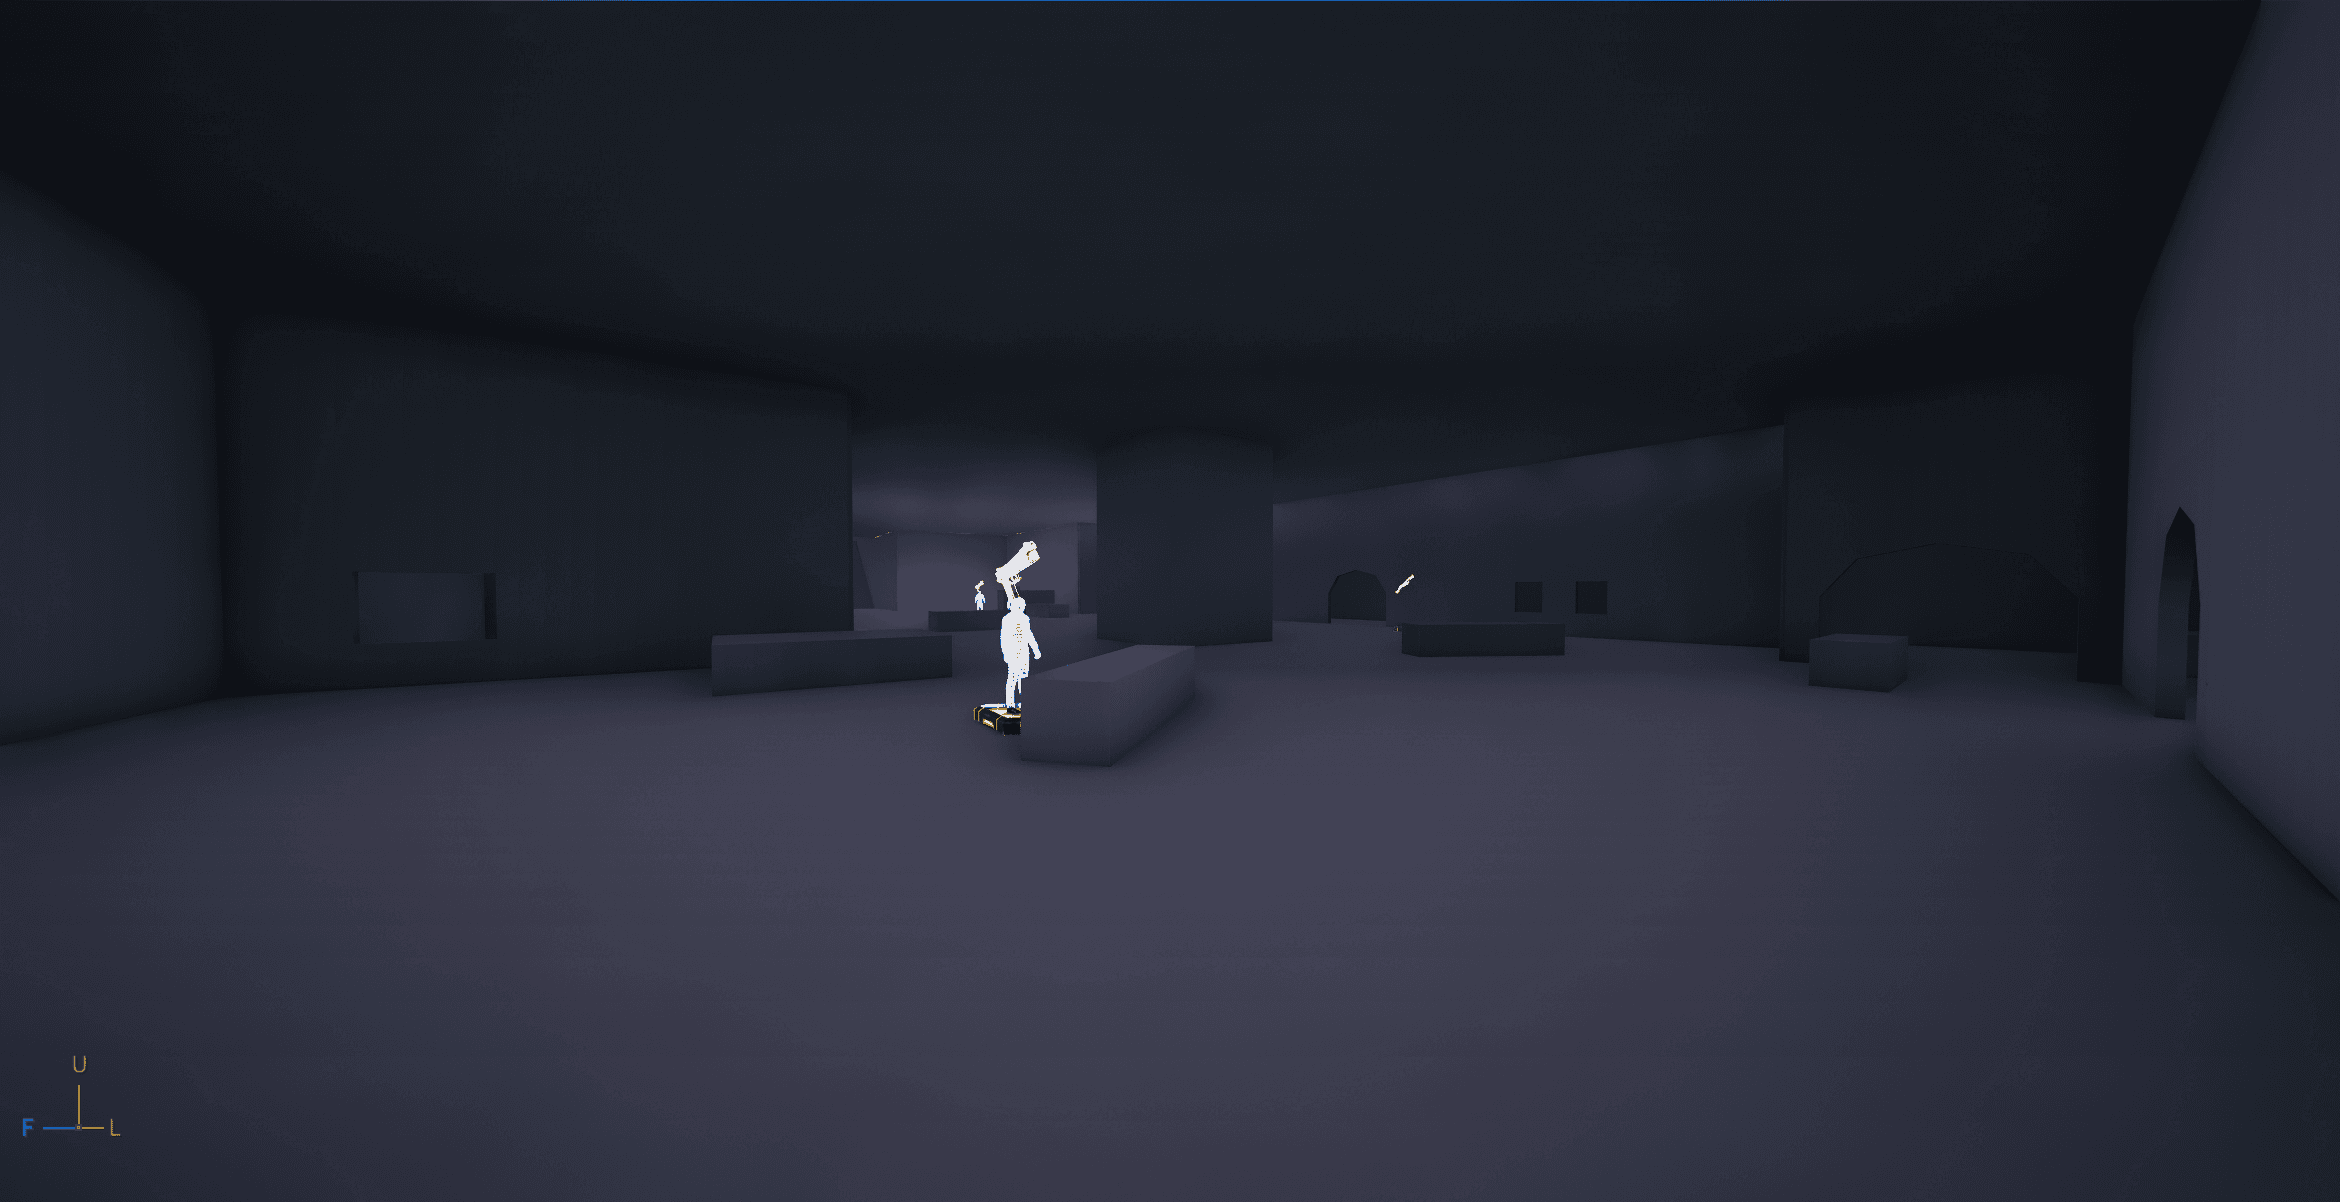
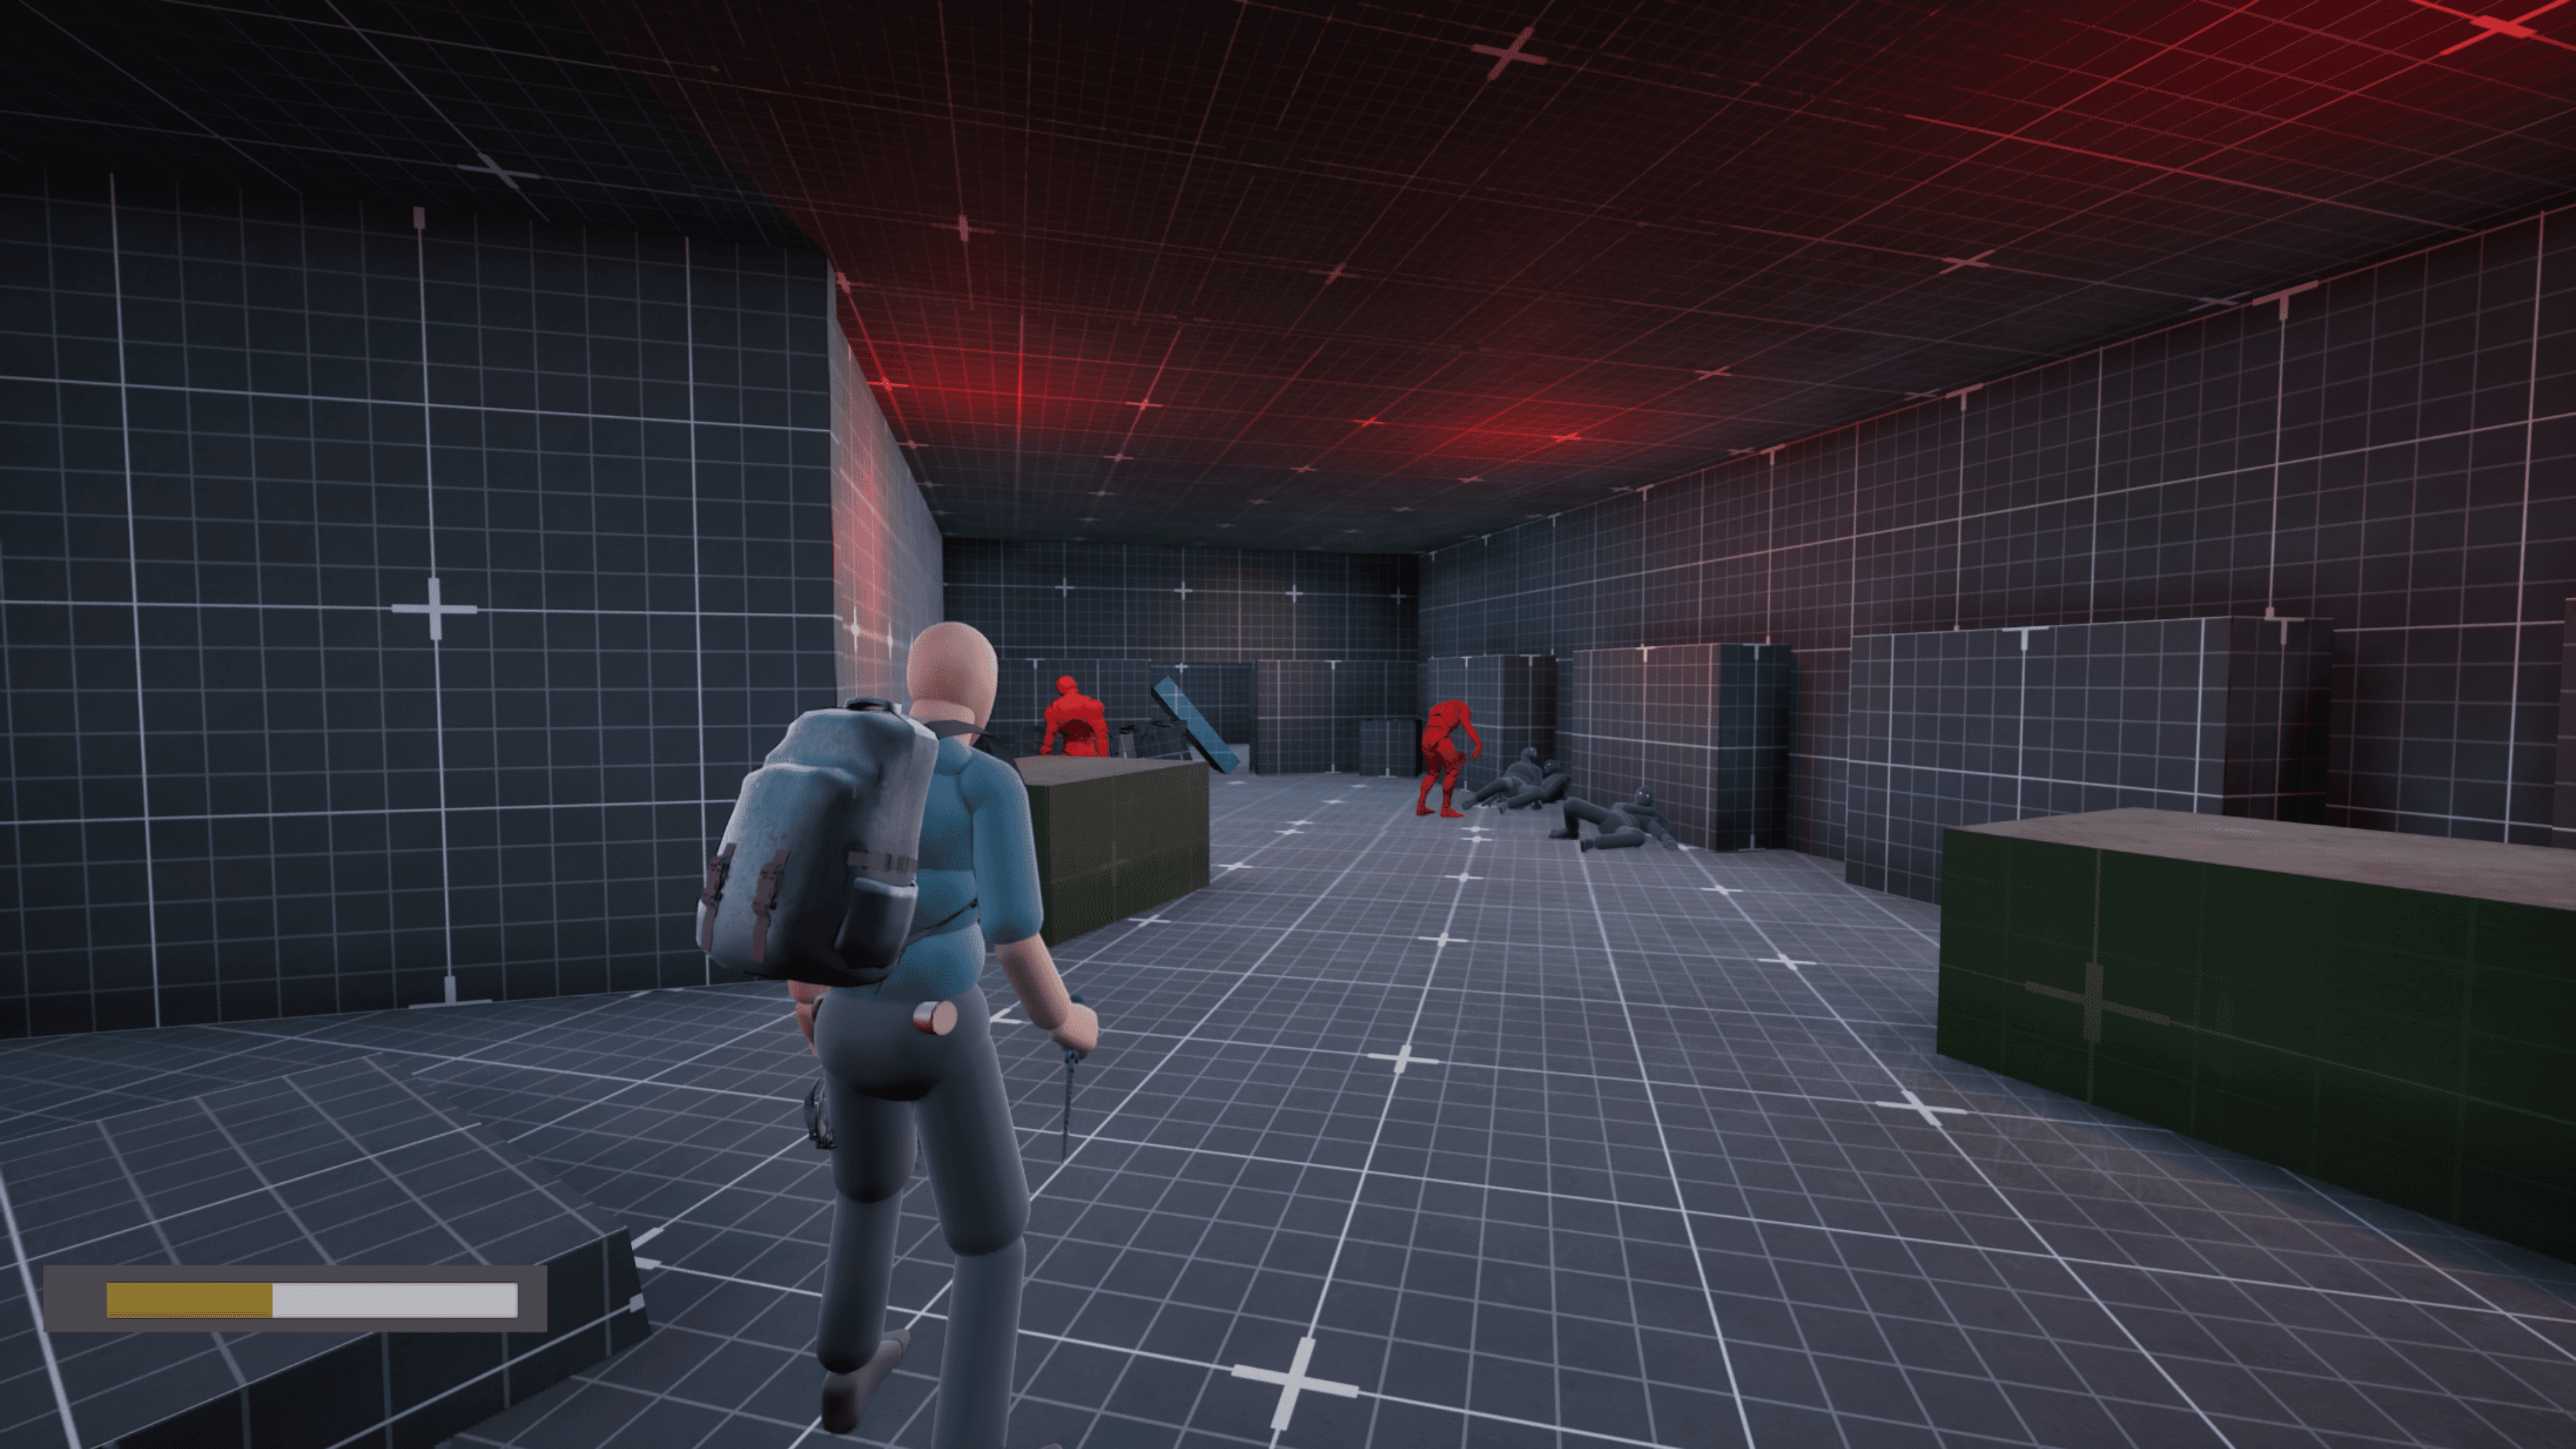
The paper design was translated verbatim into a greybox. All three weapon types were pickable and functional. The all-white geometry proved the layout's flow was navigable and the encounter was playable end-to-end. This version included a direct shortcut from the second floor via ledge climbing. The Soulslike death-reset system had not yet been implemented — checkpoints and enemy persistence were still unresolved design questions at this stage.
The paper design was translated verbatim into a greybox. All three weapon types were pickable and functional. The all-white geometry proved the layout's flow was navigable and the encounter was playable end-to-end. This version included a direct shortcut from the second floor via ledge climbing. The Soulslike death-reset system had not yet been implemented — checkpoints and enemy persistence were still unresolved design questions at this stage.
The paper design was translated verbatim into a greybox. All three weapon types were pickable and functional. The all-white geometry proved the layout's flow was navigable and the encounter was playable end-to-end. This version included a direct shortcut from the second floor via ledge climbing. The Soulslike death-reset system had not yet been implemented — checkpoints and enemy persistence were still unresolved design questions at this stage.
PAPER DESIGN
PAPER DESIGN
PAPER DESIGN
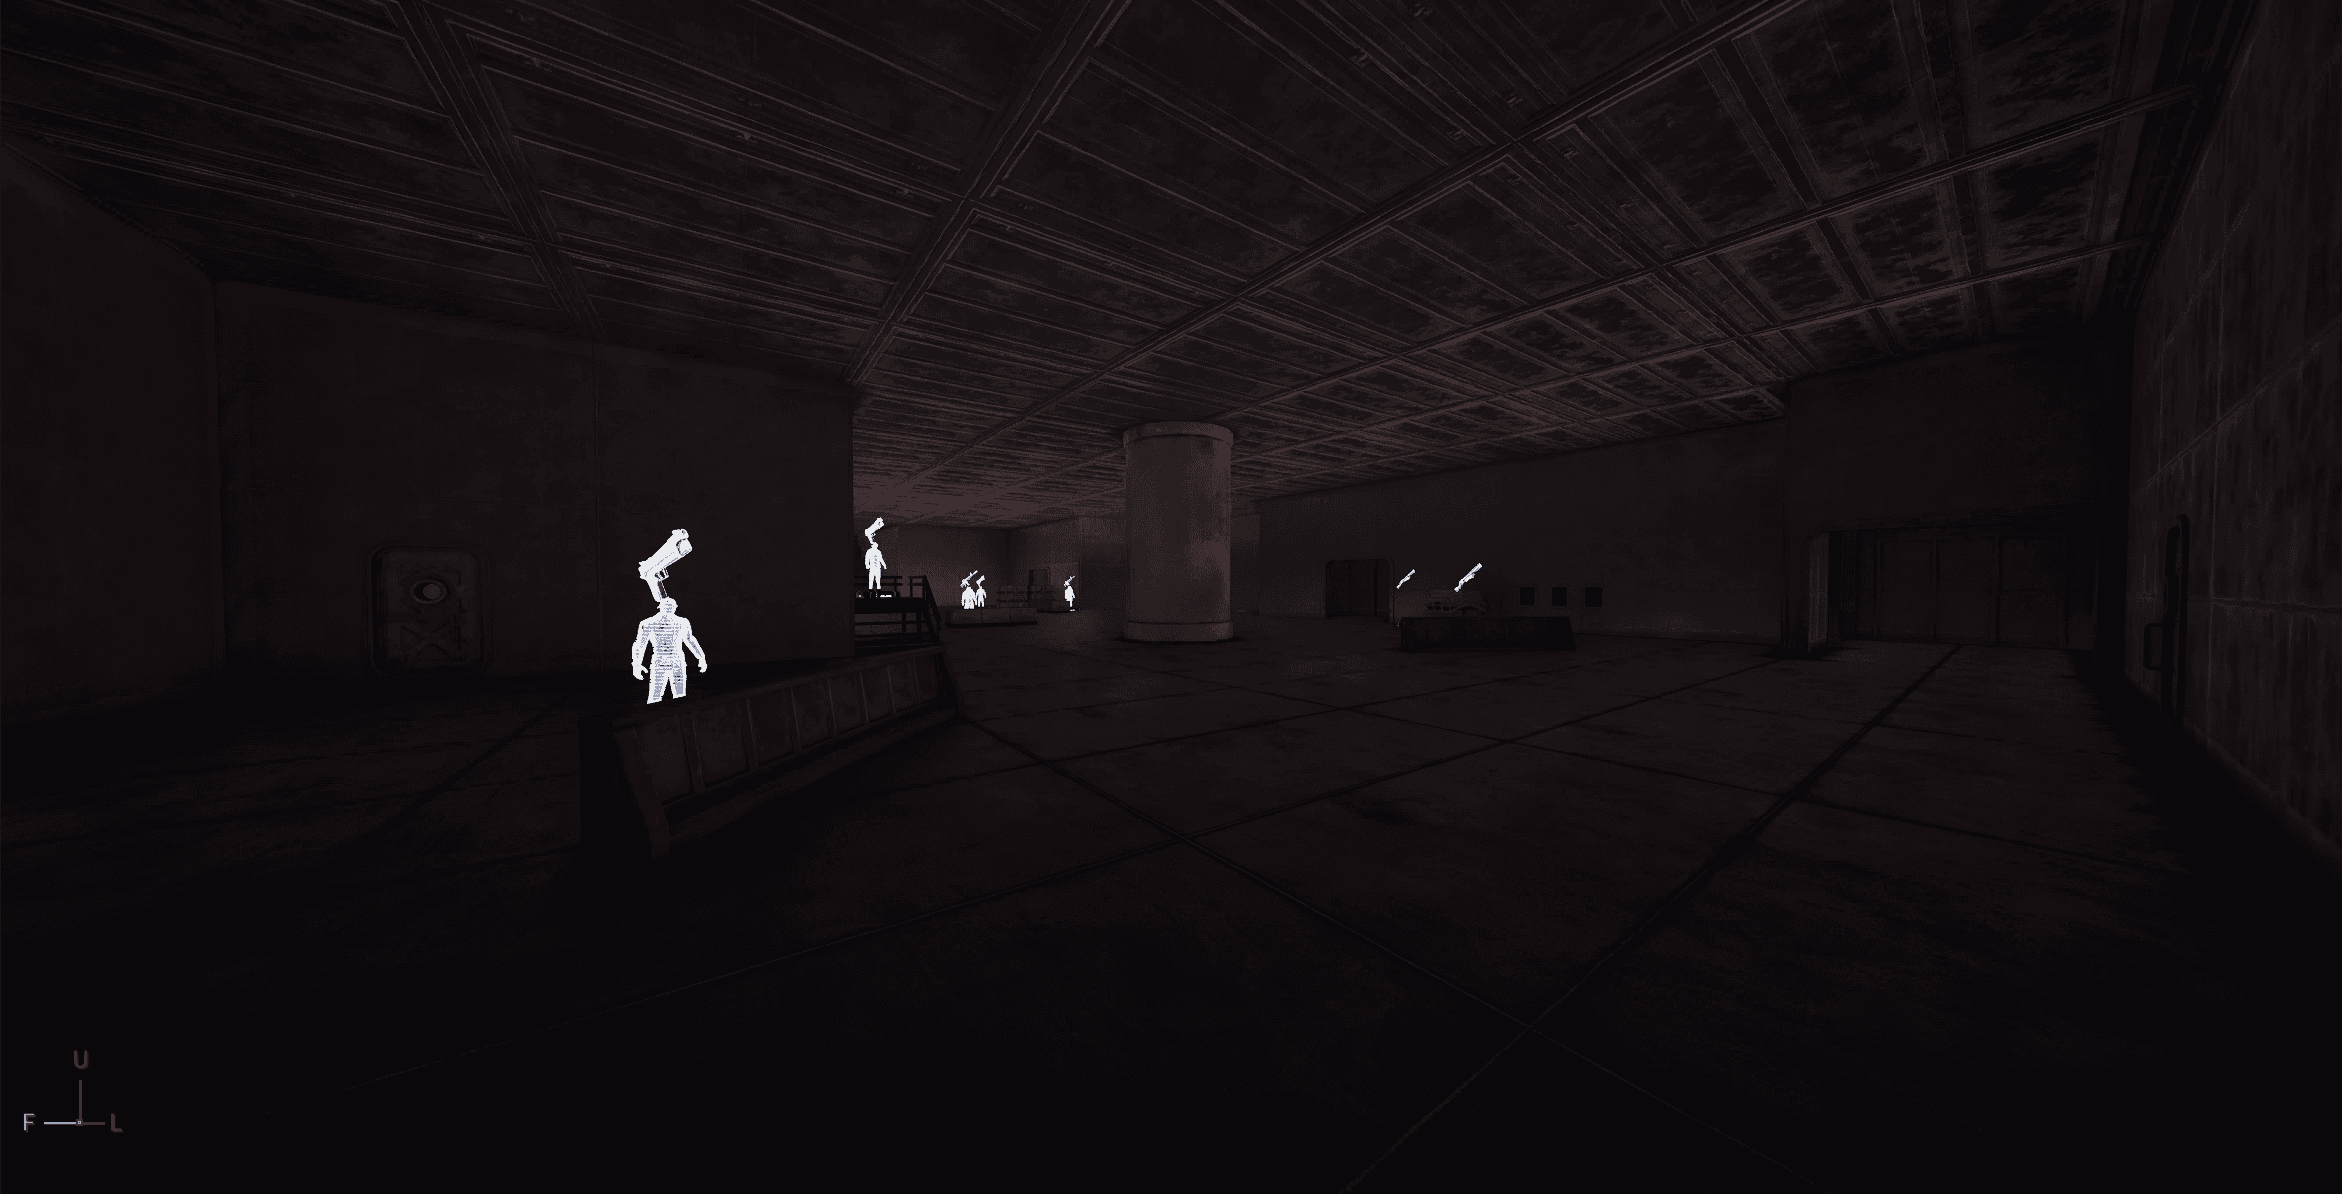
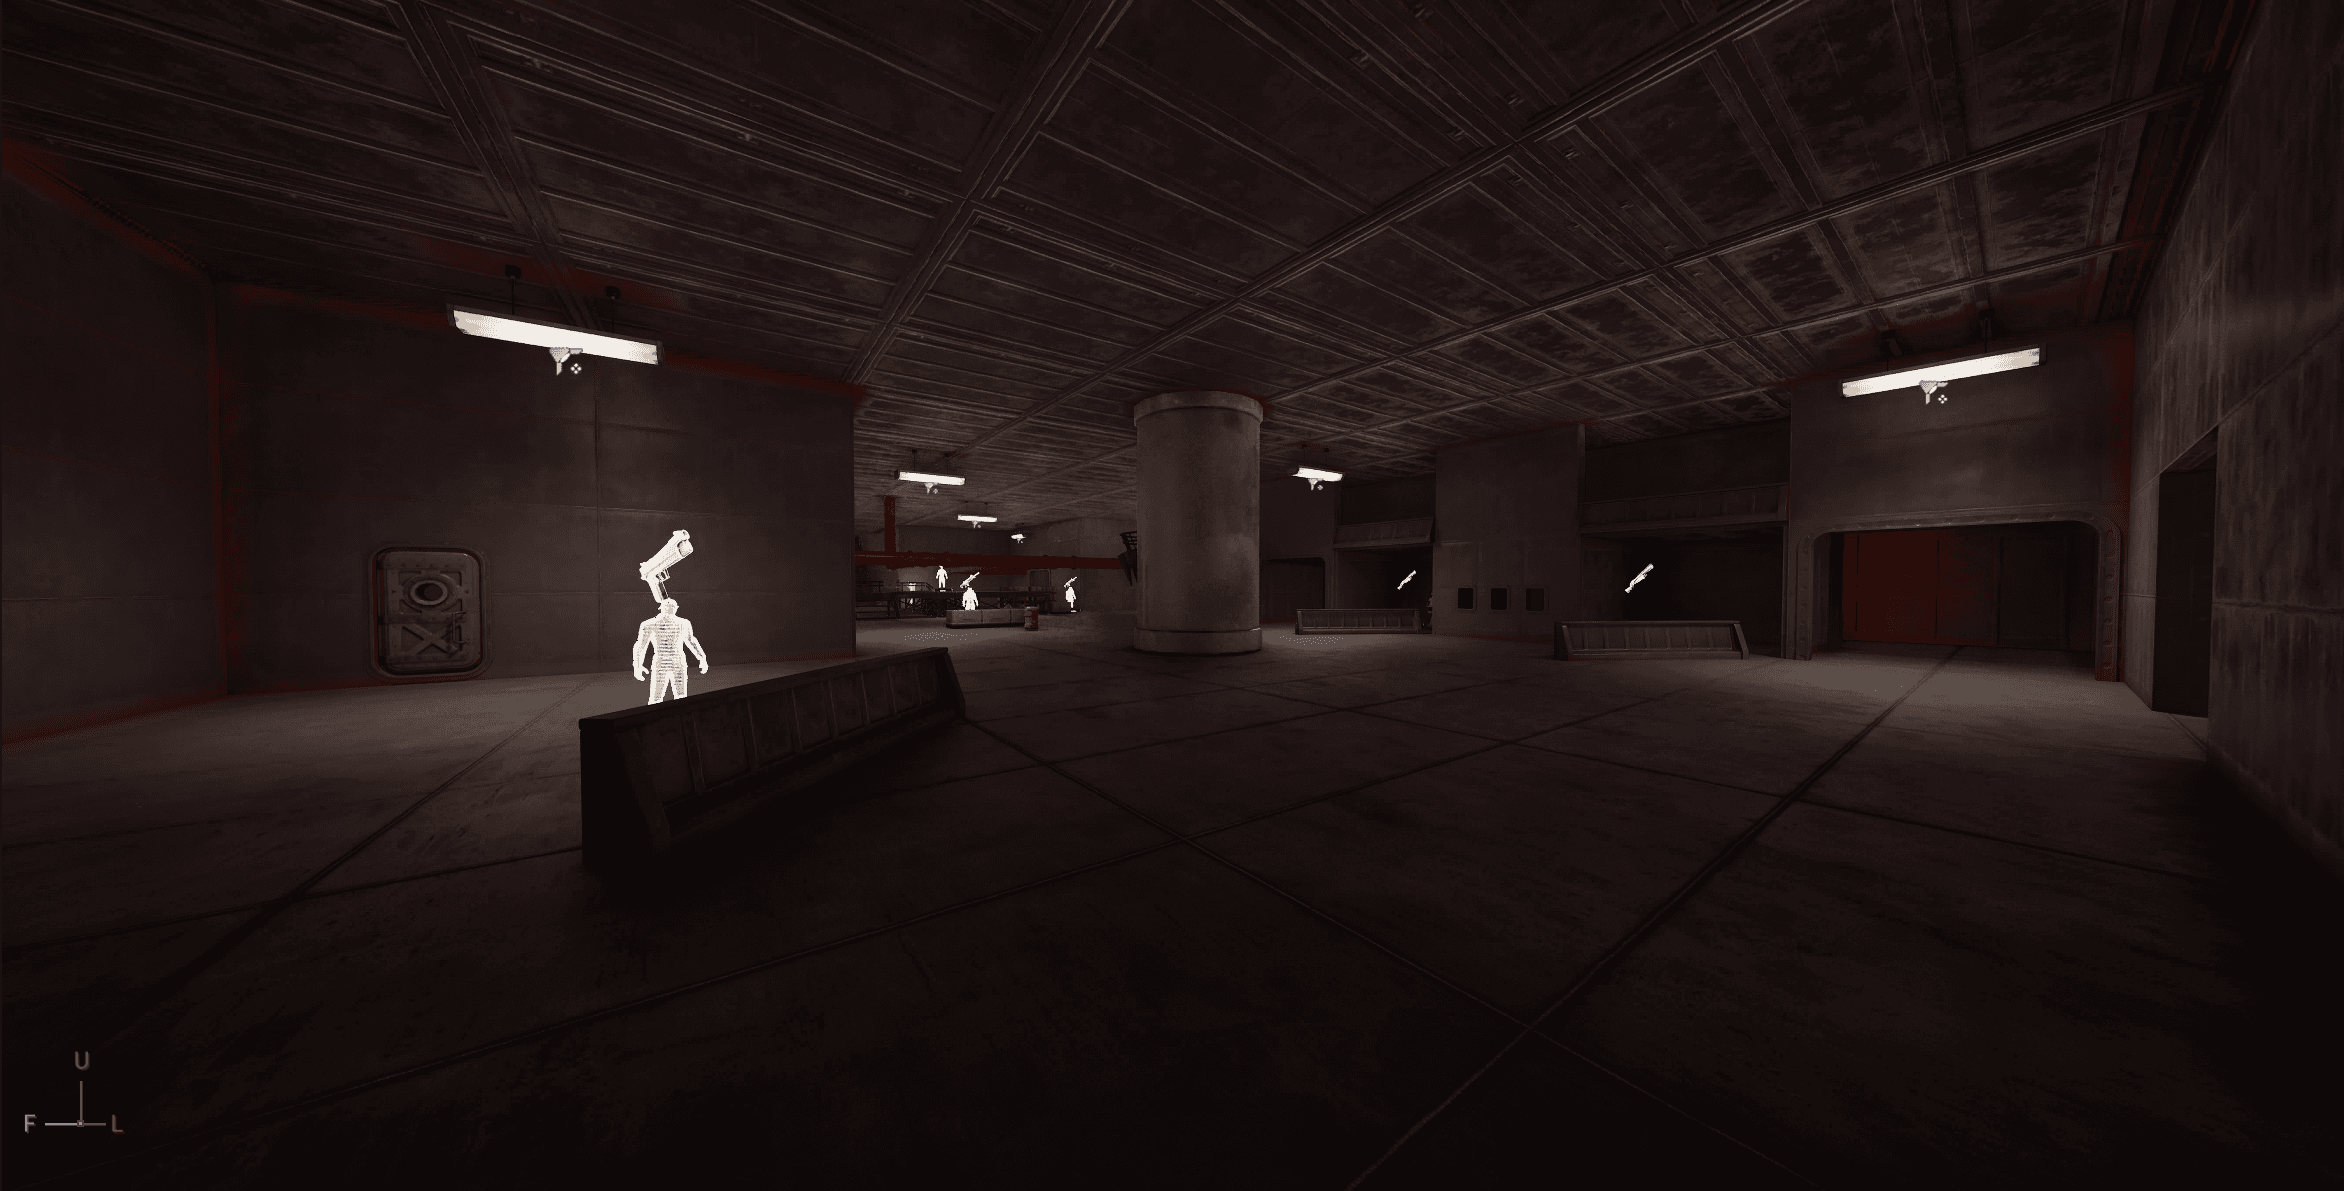
All placeholder geometry was replaced with final assets. Two significant issues emerged immediately. First, the lighting was near-nonexistent — the arena was too dark for players to read the space, and the flank routes were effectively invisible. Second, the health restoration mechanic at the time relied on med kits placed at the flank routes to reward exploration.
Playtesting revealed that applying a med kit took 5–10 seconds and could be interrupted by damage — making them unreliable enough that players avoided them. This finding cascaded: it prompted a rethink of the core health economy, not just the level layout.
All placeholder geometry was replaced with final assets. Two significant issues emerged immediately. First, the lighting was near-nonexistent — the arena was too dark for players to read the space, and the flank routes were effectively invisible. Second, the health restoration mechanic at the time relied on med kits placed at the flank routes to reward exploration.
Playtesting revealed that applying a med kit took 5–10 seconds and could be interrupted by damage — making them unreliable enough that players avoided them. This finding cascaded: it prompted a rethink of the core health economy, not just the level layout.
All placeholder geometry was replaced with final assets. Two significant issues emerged immediately. First, the lighting was near-nonexistent — the arena was too dark for players to read the space, and the flank routes were effectively invisible. Second, the health restoration mechanic at the time relied on med kits placed at the flank routes to reward exploration.
Playtesting revealed that applying a med kit took 5–10 seconds and could be interrupted by damage — making them unreliable enough that players avoided them. This finding cascaded: it prompted a rethink of the core health economy, not just the level layout.
PAPER DESIGN
PAPER DESIGN
PAPER DESIGN